准备一台新虚拟机
安装 PostgreSQL
1
2
3
4
5
6
7
8
9
10
11
12
13
14
15
16
17
18
19
20
21
22
23
24
25
26
27
28
29
30
31
32
33
34
35
36
37
38
39
40
41
42
43
44
# https://www.postgresql.org/download/linux/redhat/
# Install the repository RPM:
[zc@Sonar ~]$ sudo dnf install -y https://download.postgresql.org/pub/repos/yum/reporpms/EL-9-x86_64/pgdg-redhat-repo-latest.noarch.rpm

# Disable the built-in PostgreSQL module:
[zc@Sonar ~]$ sudo dnf -qy module disable postgresql

# Install PostgreSQL:
[zc@Sonar ~]$ sudo dnf install -y postgresql16-server

# Optionally initialize the database and enable automatic start:
[zc@Sonar ~]$ sudo /usr/pgsql-16/bin/postgresql-16-setup initdb
[zc@Sonar ~]$ sudo systemctl enable postgresql-16
[zc@Sonar ~]$ sudo systemctl start postgresql-16

# 修改 listen_addresses 和 port
# listen_addresses : 指定服务器在哪些 TCP/IP 地址上监听客户端连接。值的形式是一个逗号分隔的主机名或数字 IP 地址列表。特殊项*对应所有可用 IP 接口。
[zc@Sonar ~]$ sudo vim /var/lib/pgsql/16/data/postgresql.conf
listen_addresses = '*'
port = 5432

# 修改远程连接权限
[zc@Sonar ~]$ sudo vim /var/lib/pgsql/16/data/pg_hba.conf
host    all             all             192.168.3.1/24          trust
host    all             all             192.168.23.1/24         trust

# 重启 pgsql
[zc@Sonar ~]$ sudo systemctl restart postgresql-16

# Postgresql 安装成功后会自动创建 postgresql 用户,无密码
# 切换到 postgresql 用户
[root@Sonar ~]# su - postgres
# 连接到 pgsql ,然后修改 pgsql 超管 postgres 的密码
[postgres@Sonar ~]$ psql -p 5432 -U postgres
psql (16.1)
输入 "help" 来获取帮助信息.

postgres=# ALTER USER postgres WITH PASSWORD 'postgres'
postgres-# \q
[postgres@Sonar ~]$

# 防火墙
[zc@Sonar ~]$ sudo firewall-cmd --add-port=5432/tcp --permanent
[zc@Sonar ~]$ sudo firewall-cmd --reload
在 PostgreSQL 中为 SonarQube 创建用户和数据库
1
2
3
4
5
6
7
8
[postgres@Sonar ~]$ psql -p 5432 -U postgres
psql (16.1)
输入 "help" 来获取帮助信息.

postgres=# CREATE USER sonar WITH PASSWORD 'sonar';
CREATE ROLE
postgres=# CREATE DATABASE sonar WITH ENCODING = 'UTF8' OWNER sonar;
CREATE DATABASE
- If you want to use a custom schema and not the default “public” one, the PostgreSQL search_path property must be set:
ALTER USER mySonarUser SET search_path to mySonarQubeSchema
安装 Java
1
2
3
4
5
6
7
8
9
10
[zc@Sonar ~]$ mkdir software
[zc@Sonar ~]$ cd software
[zc@Sonar software]$ wget https://cdn.azul.com/zulu/bin/zulu17.46.19-ca-jdk17.0.9-linux_x64.tar.gz
[zc@Sonar software]$ sudo tar -zxf zulu17.46.19-ca-jdk17.0.9-linux_x64.tar.gz -C /usr/local/
[zc@Sonar software]$ sudo ln -s /usr/local/zulu17.46.19-ca-jdk17.0.9-linux_x64 /usr/local/java
[zc@Sonar software]$ sudo vim /etc/profile
JAVA_HOME=/usr/local/java
PATH=$JAVA_HOME/bin:$PATH
export JAVA_HOME PATH
[zc@Sonar software]$ source /etc/profile
安装 SonarQube 社区版
- 下载 https://www.sonarsource.com/products/sonarqube/downloads/
- 解压
1
2
3
4
5
[zc@Sonar software]$ sudo yum install -y zip unzip
[zc@Sonar software]$ unzip sonarqube-9.9.3.79811.zip

[zc@Sonar software]$ sudo mkdir /usr/local/sonarqube
[zc@Sonar software]$ sudo mv sonarqube-9.9.3.79811/* /usr/local/sonarqube/
- sonarqube 不能用 root 启动,新建用户来管理 sonarqube
1
2
3
[zc@Sonar software]$ sudo useradd sonar
[zc@Sonar software]$ sudo passwd sonar
[zc@Sonar software]$ sudo chown -R sonar:sonar /usr/local/sonarqube
- 编辑 sonarqube 配置文件
1
2
3
4
5
6
7
8
9
[zc@Sonar software]$ sudo vim /usr/local/sonarqube/conf/sonar.properties
# The schema must be created first.
sonar.jdbc.username=sonar
sonar.jdbc.password=sonar
#----- PostgreSQL 11 or greater
# By default the schema named "public" is used. It can be overridden with the parameter "currentSchema".
sonar.jdbc.url=jdbc:postgresql://192.168.23.15:5432/sonar?currentSchema=public
# TCP port for incoming HTTP connections. Default value is 9000.
sonar.web.port=9000
- 防火墙
1
2
[zc@Sonar ~]$ sudo firewall-cmd --add-port=9000/tcp --permanent
[zc@Sonar ~]$ sudo firewall-cmd --reload
- 设置系统参数,否则 sonarqube 依赖的 elasticsearch 会启动失败
1
2
3
[zc@Sonar ~]$ sudo vim /etc/sysctl.conf
vm.max_map_count = 655360
[zc@Sonar ~]$ sudo sysctl -p
- 启动
1
2
3
4
5
6
[zc@Sonar software]$ su - sonar
[sonar@Sonar ~]$ sudo ln -s /usr/local/sonarqube/bin/linux-x86-64/sonar.sh /usr/bin/sonar
[sonar@Sonar ~]$ sonar start
/usr/local/java/bin/java
Starting SonarQube...
Started SonarQube.
- 访问 http://192.168.23.15:9000/ admin/admin ,初次登陆后需修改密码
- 开机启动
1
2
3
4
5
6
7
8
9
10
11
12
13
14
15
16
[root@Sonar ~]# vim /usr/lib/systemd/system/rc-local.service
[Install]
WantedBy=multi-user.target

[root@Sonar ~]# systemctl enable rc-local
Created symlink /etc/systemd/system/multi-user.target.wants/rc-local.service → /usr/lib/systemd/system/rc-local.service.

[root@Sonar ~]# ll /etc/rc.local
lrwxrwxrwx. 1 root root 13  9月 27 16:19 /etc/rc.local -> rc.d/rc.local
[root@Sonar ~]# ll /etc/rc.d/rc.local
-rw-r--r--. 1 root root 474  9月 27 16:19 /etc/rc.d/rc.local
[root@Sonar ~]# chmod u+x /etc/rc.d/rc.local

[root@Sonar ~]# vim /etc/rc.local
# 以指定的用户身份执行命令
su - sonar -c "/usr/local/sonarqube/bin/linux-x86-64/sonar.sh start"
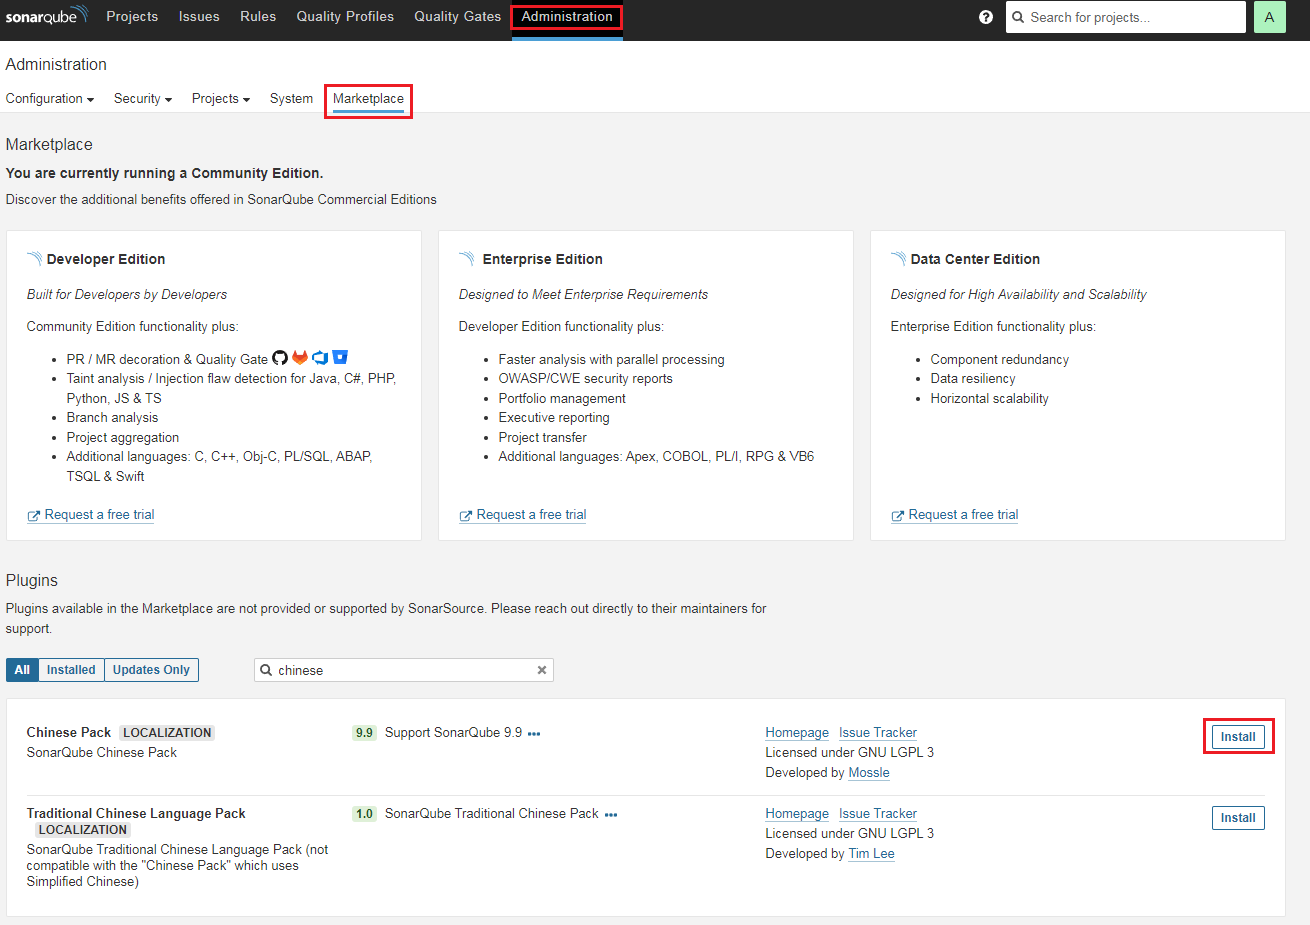
- 安装中文插件
- 创建 token
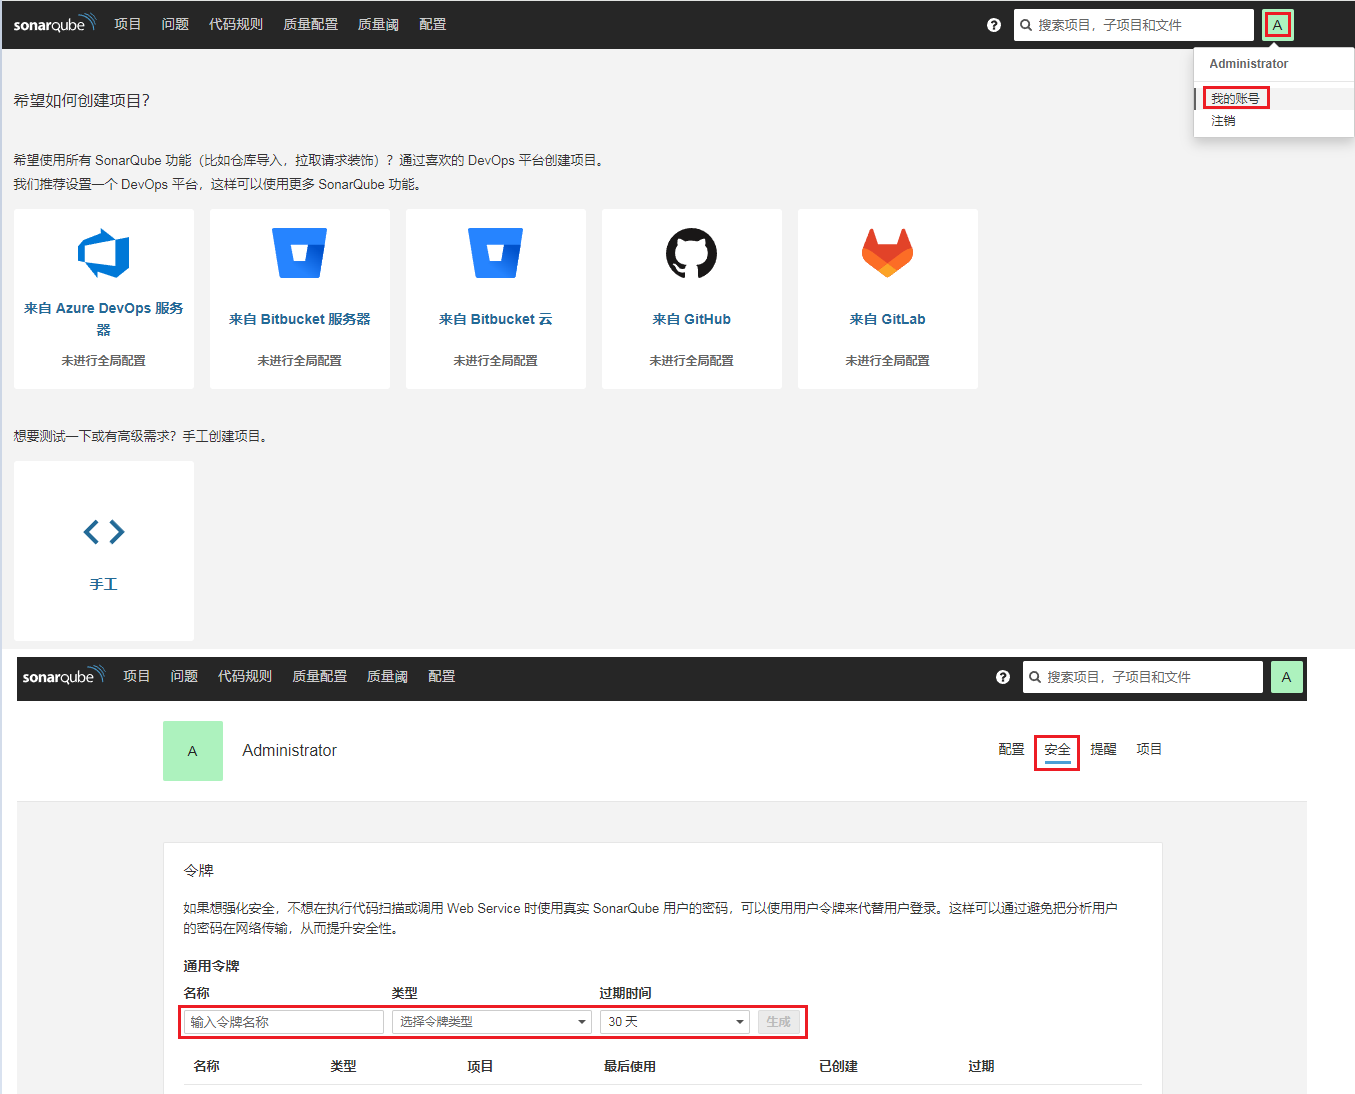
- token 创建后需要马上复制保存,系统中不会再次显示该 token 的值
- 本例创建的 token 的值是
sqa_b3d44ba9d1d50b81942312c20c16651de24b72bd
Jenkins 集成 SonarQube
- jenkins 安装
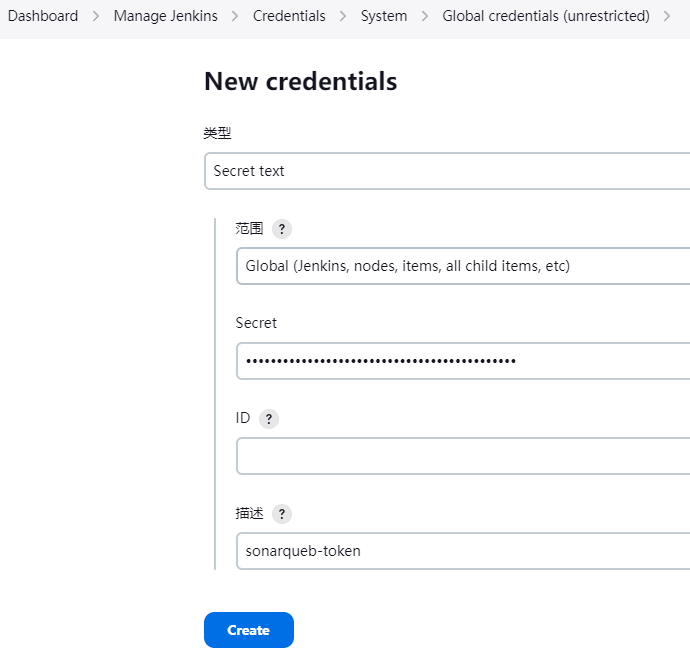
SonarQube Scanner插件 - 添加 SonarQube 凭证
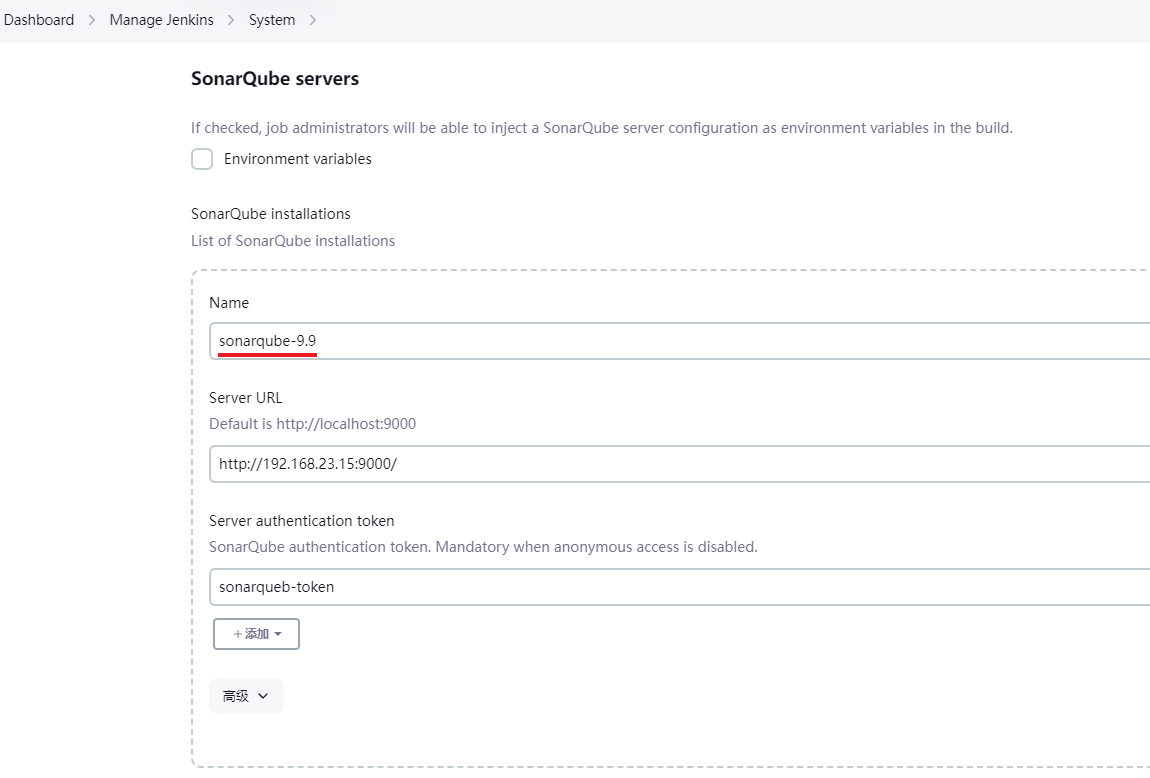
- 在 Jenkins 中配置 SonarQube
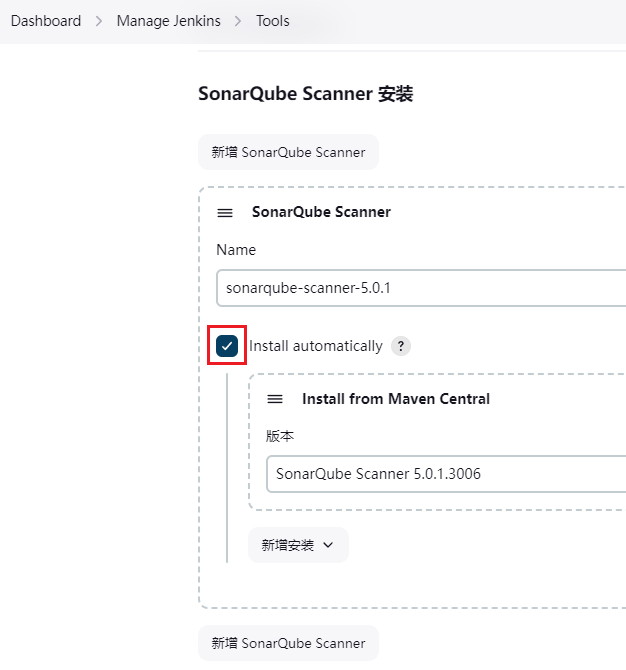
-
SonaQube 关闭审查结果上传到 SCM 功能
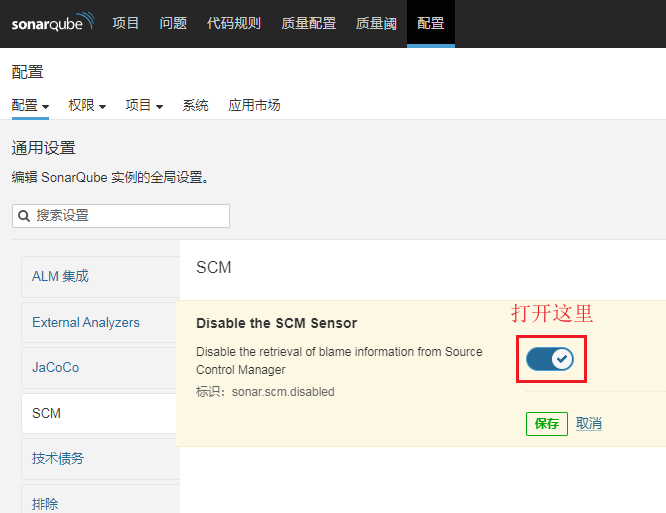
- SCM 功能可以自动分配问题,不建议关闭
- 需要在 sonarqube 中添加用户,且用户名与 git 或 svn 上的一样
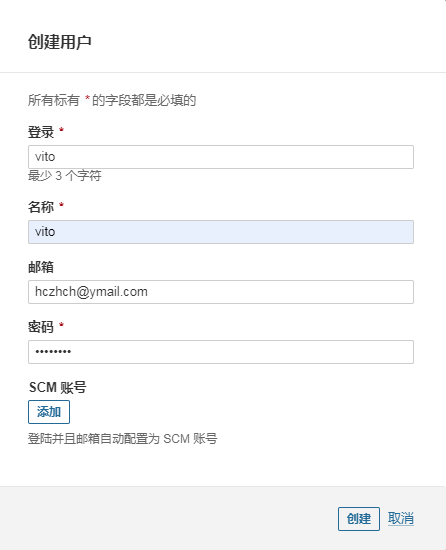
- 如果是 svn 则还需额外在 sonarqube 中填写一个能够访问 svn 的账号信息
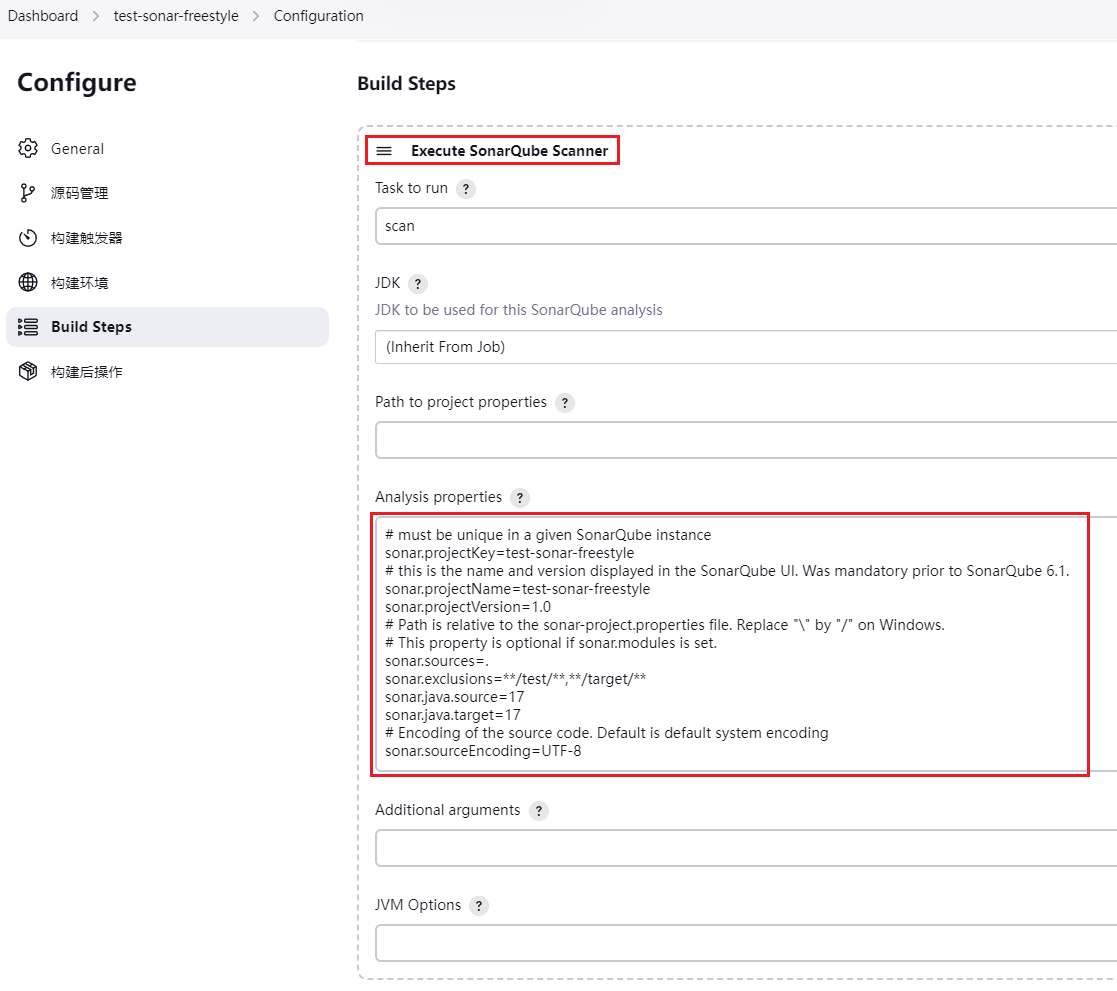
- 在 jenkins 项目中添加 SonaQube 代码审查(非流水线项目)
1
2
3
4
5
6
7
8
9
10
11
12
13
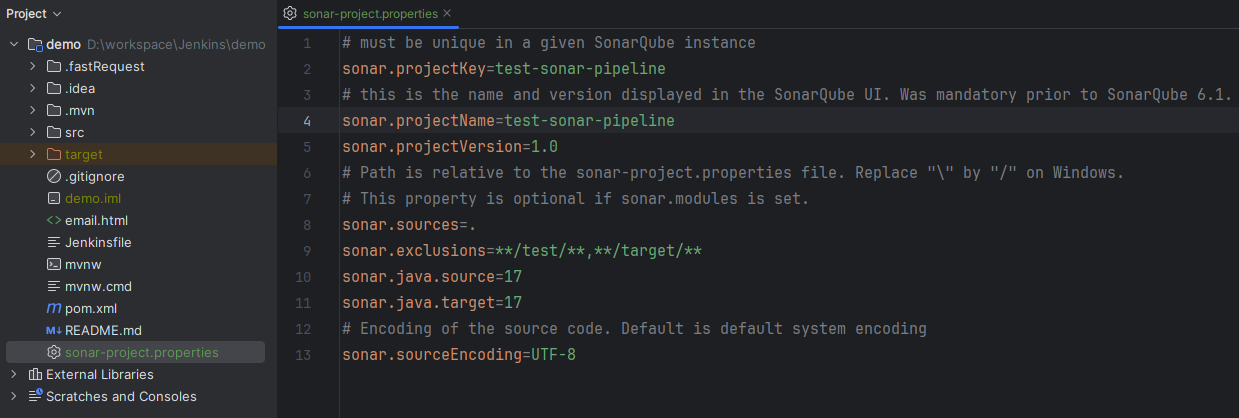
# must be unique in a given SonarQube instance
sonar.projectKey=test-sonar-freestyle
# this is the name and version displayed in the SonarQube UI. Was mandatory prior to SonarQube 6.1.
sonar.projectName=test-sonar-freestyle
sonar.projectVersion=1.0
# Path is relative to the sonar-project.properties file. Replace "\" by "/" on Windows.
# This property is optional if sonar.modules is set.
sonar.sources=.
sonar.exclusions=**/test/**,**/target/**
sonar.java.source=17
sonar.java.target=17
# Encoding of the source code. Default is default system encoding
sonar.sourceEncoding=UTF-8
- 在 jenkins 项目中添加 SonarQube 代码审查(流水线项目)
- 在项目的根目录下创建 sonar-project.properties 文件(文件名是固定的)
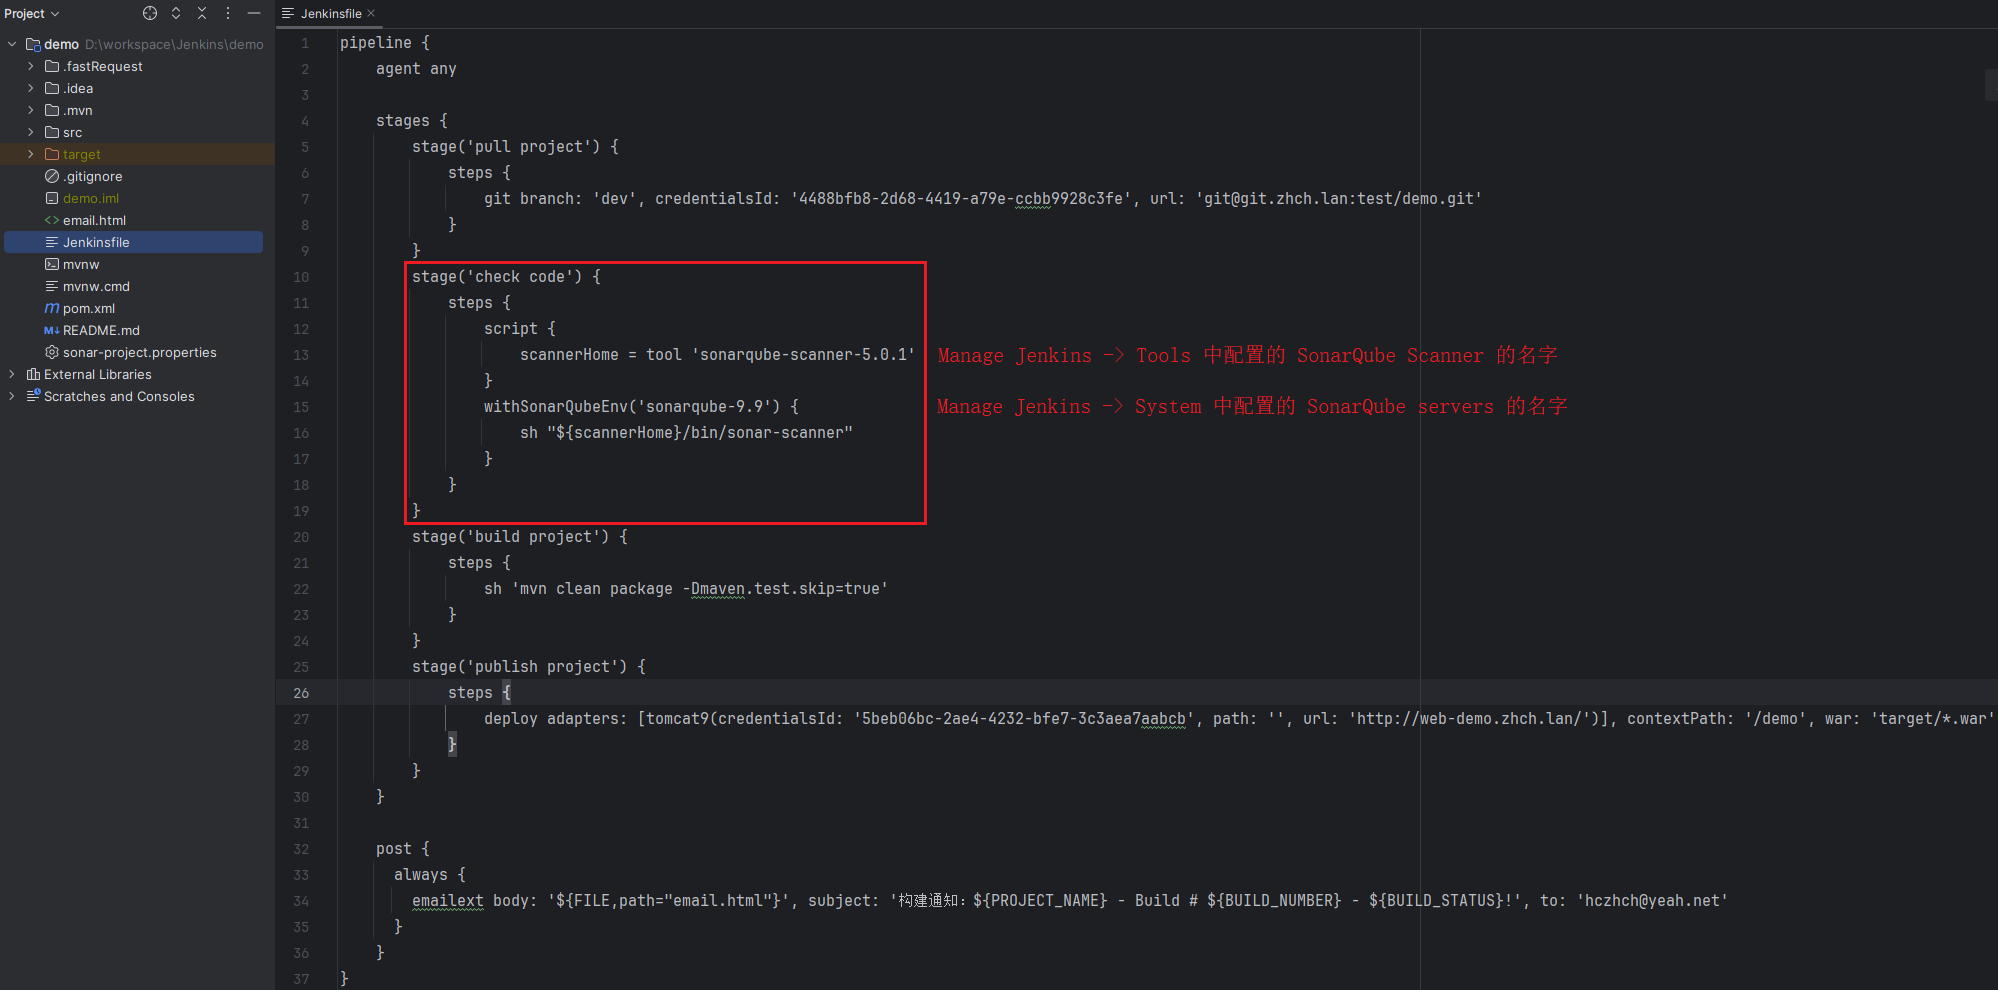
- 修改 pipeline 脚本,加入 SonarQube 代码审查阶段
- 在项目的根目录下创建 sonar-project.properties 文件(文件名是固定的)
IDEA 整合 SonarQube
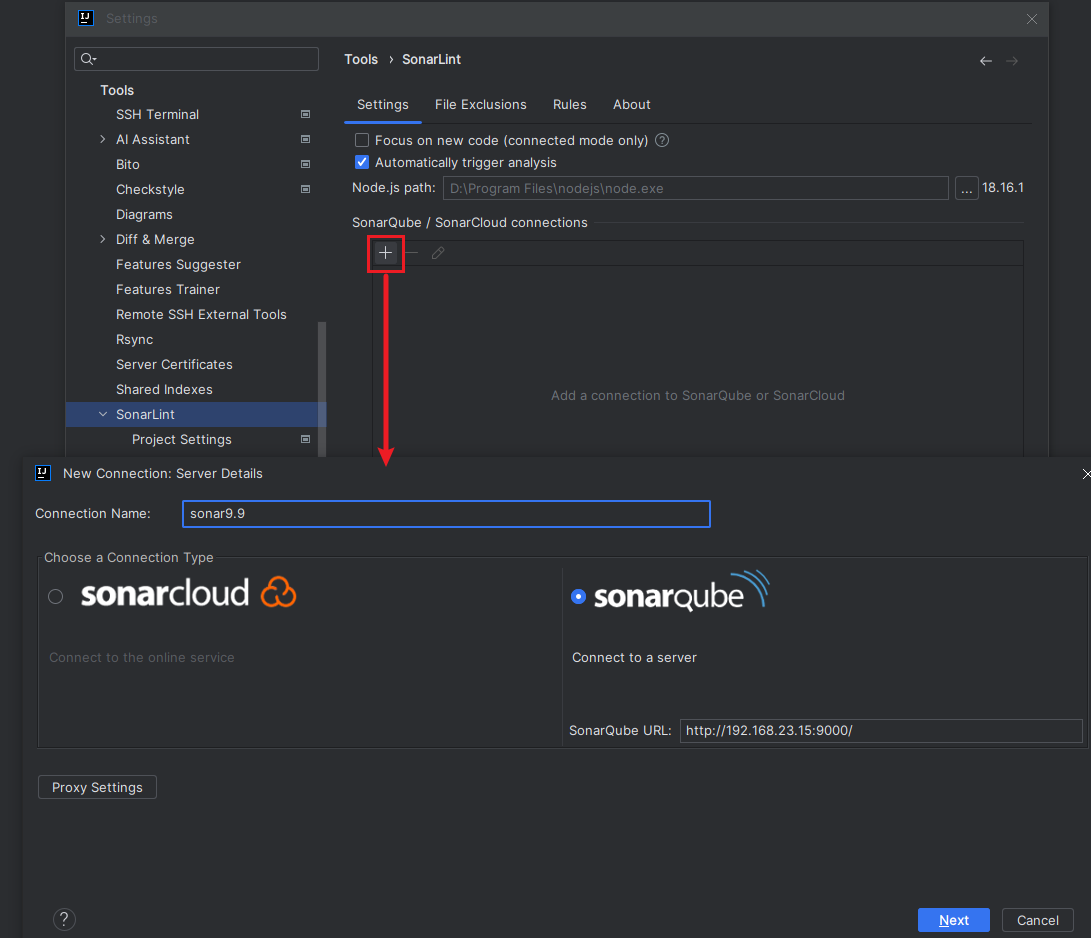
- idea 安装 SonarLint 插件
Maven 整合 SonarQube
- 在 maven 的 settings.xml 配置文件中添加如下设置
1
2
3
4
5
6
7
8
9
10
11
<profile>
  <id>sonar-9.9</id>
  <activation>
    <activeByDefault>false</activeByDefault>
  </activation>
  <properties>
    <sonar.login>sqa_b3d44ba9d1d50b81942312c20c16651de24b72bd</sonar.login>
    <sonar.host.url>http://192.168.23.15:9000</sonar.host.url>
    <sonar.language>java</sonar.language>
  </properties>
</profile>
- 执行如下 maven 指令进行项目代码审查
mvn sonar:sonar -P sonar-9.9
补充:SonarQube webhook
添加 webhook
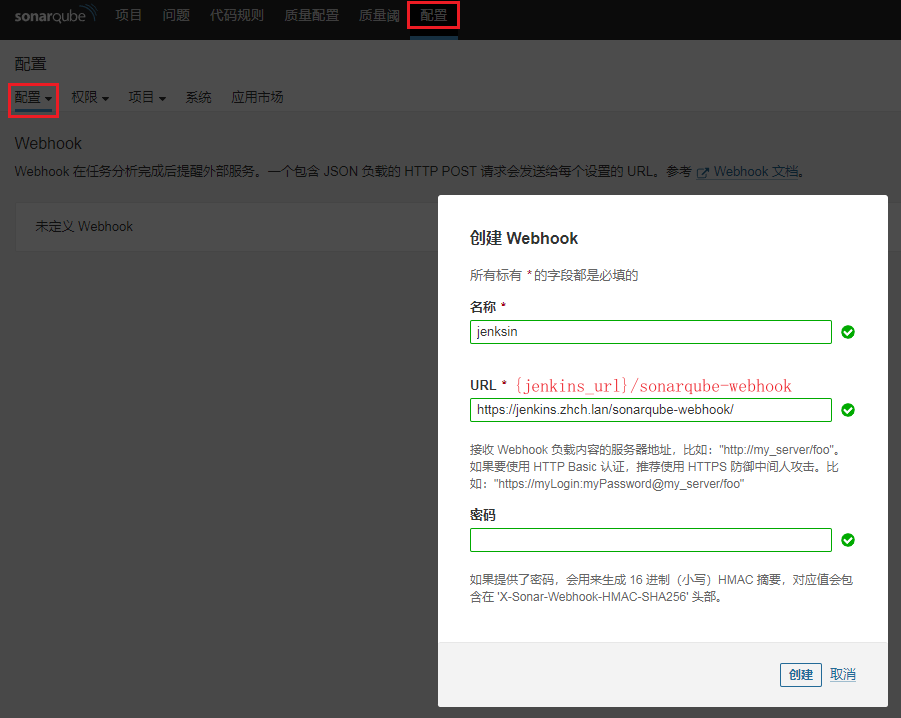
- 上图添加的是全局 webhook
- 也可以在项目配置中添加项目级别的 webhook
jenkins 等待 webhook 结果,然后判定流程是否继续
1
2
3
4
5
6
7
8
9
10
11
12
13
14
stage('Check') {
    script {
        scannerHome = tool 'sonarqube-scanner-5.0.1'
    }
    dir("${contextPath}") {
        withSonarQubeEnv('sonarqube-9.9') {
            sh "${scannerHome}/bin/sonar-scanner"
        }
    }
    timeout(time: 3, unit: 'MINUTES') {
        // waitForQualityGate : 等待 SonarQube 分析完成并返回质量状态
        waitForQualityGate abortPipeline: true
    }
}