什么是反向代理
- 简单讲,正向代理,代理机是客户端的代理者;反向代理,代理机是服务端的代理者。
- 所谓代理就是代为处理,正向代理代请求者发请求,当然返回的请求也会发回给请求者,例如客户端用VPN隐藏自己的真实信息。
- 反向代理代服务端接受请求,转发给服务端,服务端的响应再发回去。
- 所以一般来说客户端的代理机就是正向代理,服务端的代理机就是反向代理。
Nginx 源码安装与运行
1
2
3
4
5
6
7
8
9
10
11
12
13
14
15
16
17
18
19
20
21
22
23
24
25
26
27
28
29
30
31
32
33
34
35
36
37
38
39
40
41
42
43
44
45
46
47
48
49
50
51
52
53
54
55
56
57
58
59
60
61
62
63
64
65
66
67
68
69
70
71
72
73
74
75
76
77
78
79
80
81
82
83
84
85
86
87
88
89
90
91
92
93
94
95
96
97
#1. 安装依赖环境
#1.1. 安装 gcc 环境
[root@Nginx-1 software]# yum -y install gcc-c++
#1.2. 安装 PCRE 库,用于解析正则表达式
[root@Nginx-1 software]# yum -y install pcre pcre-devel
#1.3. 安装 zlib 压缩和解压缩依赖
[root@Nginx-1 software]# yum -y install zlib zlib-devel
#1.4. SSL 安全的安全的套接字协议层,用于 HTTP 安全传输,也就是 HTTPS
[root@Nginx-1 software]# yum -y install openssl openssl-devel

#2. 下载 Nginx
[root@Nginx-1 software]# wget http://nginx.org/download/nginx-1.24.0.tar.gz
#3. 解压,解压后得到的是源码,需要编译后才能安装
[root@Nginx-1 software]# tar -zxvf nginx-1.24.0.tar.gz

#4. 编译之前,先创建 nginx 临时目录,如果不创建,在启动 nginx 的过程中会报错
[root@Nginx-1 software]# mkdir -p /var/temp/nginx

#5. 在 nginx 源码目录输入如下命令进行配置,用以创建 Makefile 文件
[root@Nginx-1 software]# cd nginx-1.24.0
[root@Nginx-1 nginx-1.24.0]# ./configure \
--prefix=/usr/local/nginx \
--pid-path=/var/run/nginx.pid \
--lock-path=/var/lock/nginx.lock \
--error-log-path=/var/log/nginx/error.log \
--http-log-path=/var/log/nginx/access.log \
--with-http_gzip_static_module \
--http-client-body-temp-path=/var/temp/nginx/client \
--http-proxy-temp-path=/var/temp/nginx/proxy \
--http-fastcgi-temp-path=/var/temp/nginx/fastcgi \
--http-uwsgi-temp-path=/var/temp/nginx/uwsgi \
--http-scgi-temp-path=/var/temp/nginx/scgi

#6. 编译
[root@Nginx-1 nginx-1.24.0]# make

#7. 安装
[root@Nginx-1 nginx-1.24.0]# make install

#8. 启动与停止
[root@Nginx-1 nginx-1.24.0]# whereis nginx
nginx: /usr/local/nginx
[root@Nginx-1 nginx-1.24.0]# cd /usr/local/nginx
[root@Nginx-1 nginx]# ll
总用量 4
drwxr-xr-x. 2 root root 4096 11月 11 16:41 conf
drwxr-xr-x. 2 root root   40 11月 11 16:41 html
drwxr-xr-x. 2 root root   19 11月 11 16:41 sbin
[root@Nginx-1 sbin]# pwd
/usr/local/nginx/sbin
[root@Nginx-1 sbin]# ./nginx
[root@Nginx-1 sbin]# ./nginx -s reload
[root@Nginx-1 sbin]# ./nginx -s stop
# quit 优雅关闭
[root@Nginx-1 sbin]# ./nginx -s quit
# -t 检查配置文件是否有错
[root@Nginx-1 sbin]# ./nginx -t
# -v 显示nginx版本;-V 除了显示版本外,还会显示编译的环境(gcc版本、自定义编译参数)
[root@Nginx-1 sbin]# ./nginx -v
# -h / -? nginx命令的帮助信息
[root@Nginx-1 sbin]# ./nginx -h
# -c 指定配置文件
[root@Nginx-1 sbin]# ./nginx -c /usr/local/nginx/conf/nginx.conf

# 创建软连接,避免每次使用 nginx 命令的时候都需要进入 /usr/local/nginx/sbin 目录
[root@Nginx-1 ~]# ln -s /usr/local/nginx/sbin/nginx /usr/sbin/nginx

#9. 防火墙
[root@Nginx-1 sbin]# firewall-cmd --permanent --zone=public --add-service=http
[root@Nginx-1 sbin]# firewall-cmd --permanent --zone=public --add-service=https
[root@Nginx-1 sbin]# firewall-cmd --reload

#10. 把 nginx 做成 service 并开机自启动(注意 nginx 命令文件、配置文件、pid文件的路径要正确)
[root@Nginx-1 sbin]# vi /etc/systemd/system/nginx.service
[Unit]
Description=nginx - high performance web server
Documentation=http://nginx.org/en/docs/
After=network-online.target remote-fs.target nss-lookup.target
Wants=network-online.target

[Service]
Type=forking
PIDFile=/var/run/nginx.pid
ExecStart=/usr/local/nginx/sbin/nginx -c /usr/local/nginx/conf/nginx.conf
ExecReload=/bin/sh -c "/bin/kill -s HUP $(/bin/cat /var/run/nginx.pid)"
ExecStop=/bin/sh -c "/bin/kill -s TERM $(/bin/cat /var/run/nginx.pid)"

[Install]
WantedBy=multi-user.target

[root@Nginx-1 sbin]# systemctl enable nginx
Created symlink /etc/systemd/system/multi-user.target.wants/nginx.service → /etc/systemd/system/nginx.service.

[root@Nginx-1 sbin]# sudo systemctl start nginx
[root@Nginx-1 sbin]# sudo systemctl restart nginx
[root@Nginx-1 sbin]# sudo systemctl reload nginx
[root@Nginx-1 sbin]# sudo systemctl stop nginx
编译配置项说明:
| 参数 | 解释 |
|---|---|
--prefix |
指定 nginx 安装目录 |
--pid-path |
指向 nginx 进程的 pid |
--lock-path |
锁定安装文件,防止被恶意篡改或误操作 |
--error-log-path |
错误日志 |
--http-log-path |
http 日志 |
--with-http_gzip_static_module |
启用 gzip 模块,在线实时压缩输出数据流 |
--http-client-body-temp-path |
设定客户端请求的临时目录 |
--http-proxy-temp-path |
设定 http 代理临时目录 |
--http-fastcgi-temp-path |
设定 fastcgi 临时目录 |
--http-uwsgi-temp-path |
设定 uwsgi 临时目录 |
--http-scgi-temp-path |
设定 scgi 临时目录 |
--with-http_stub_status_module |
监视模块,主要用于查看 Nginx 的一些状态信息 |
--with-http_ssl_module |
HTTPS |
--with-http_v2_module |
HTTP/2 |
Nginx 进程模型
1
2
3
4
[root@Nginx-1 ~]# ps -ef | grep nginx
root        7522       1  0 17:23 ?        00:00:00 nginx: master process /usr/local/nginx/sbin/nginx -c /usr/local/nginx/conf/nginx.conf
nobody      7523    7522  0 17:23 ?        00:00:00 nginx: worker process
root        7540    4754  0 17:33 pts/1    00:00:00 grep --color=auto nginx
- Master 进程:主进程(只有一个)
- Worker 进程: 工作进程(可以有多个,在 nginx.conf 配置文件中设置)
Nginx 处理 Web 请求机制
linux 的 epoll 模型,异步非阻塞通信(多路复用器)
Nginx 配置文件结构
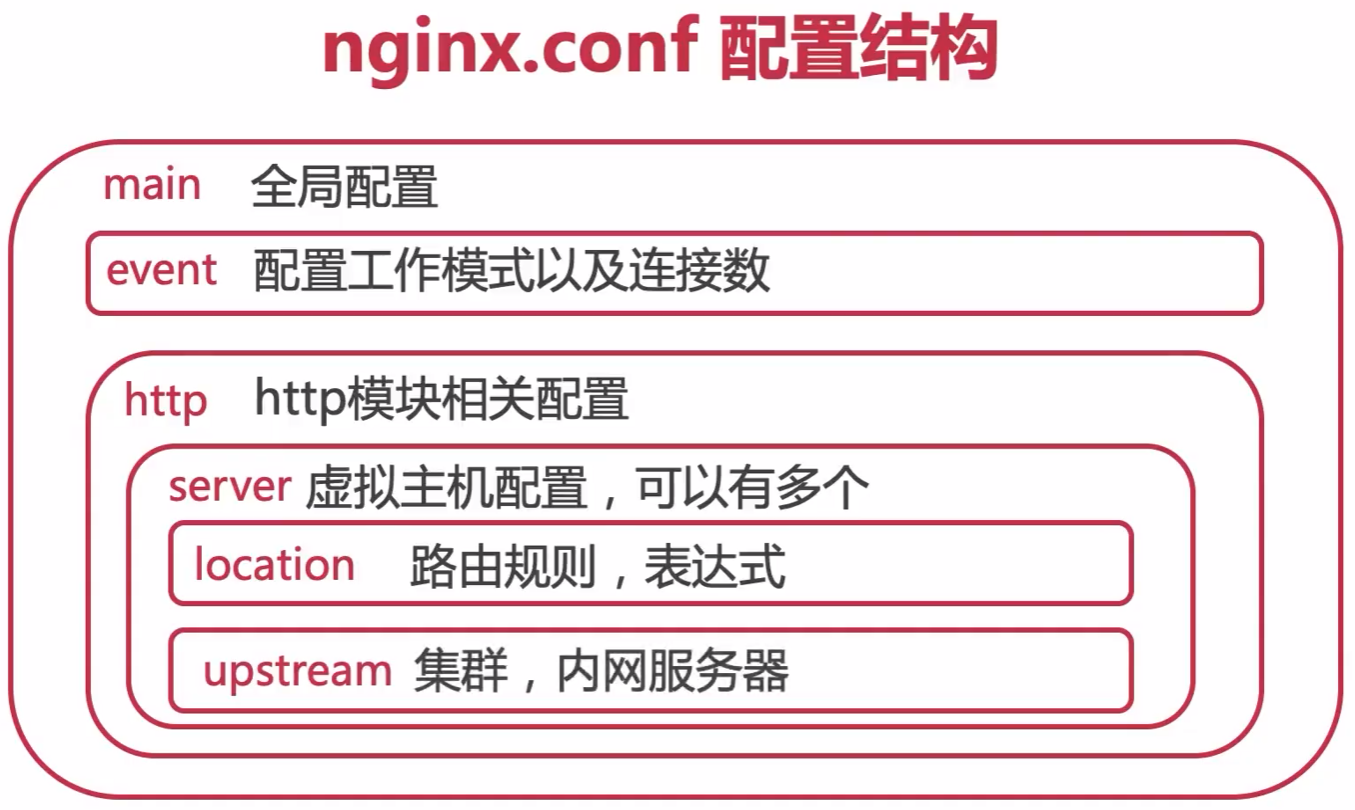
Nginx 配置文件详解
1
2
3
4
5
6
7
8
9
10
11
12
13
14
15
16
17
18
19
20
21
22
23
24
25
26
27
28
29
30
31
32
33
34
35
36
37
38
39
40
41
42
43
44
45
46
47
48
49
50
51
52
53
54
55
56
57
58
59
60
61
62
63
64
65
66
67
68
69
70
71
72
73
74
75
76
77
78
79
80
81
82
83
84
85
86
87
88
89
90
91
92
93
94
95
96
97
98
99
100
101
102
103
104
105
106
107
108
109
110
111
112
113
114
115
116
117
118
119
120
121
122
123
124
125
126
127
128
129
130
131
132
133
134
135
136
137
138
139
140
141
142
143
144
145
146
147
148
149
150
151
152
153
154
155
156
157
158
159
160
161
162
163
164
165
166
167
168
169
170
171
172
173
174
175
176
177
178
179
180
181
182
183
184
[root@Nginx-1 ~]# vim /usr/local/nginx/conf/nginx.conf
#user  nobody;  #定义执行 nginx worker 进程的用户,默认 nobody
worker_processes  1;  #worker进程的数量,默认值是1,一般要设置为cpu的核心数量

#错误日志定义类型有:debug、info、notice、warn、error、crit
#error_log  logs/error.log;  #指定错误日志路径
#error_log  logs/error.log  notice;  #指定notice类型的错误日志路径
#error_log  logs/error.log  info;  #指定全局错误日志路径

#worker_rlimit_nofile  1024;  #指定每个worker进程最多打开文件的数量,如果 worker_rlimit_nofile 的值小于 worker_connections 的值,会报如下错误:worker_connections exceed open file resource limit: xxx

#pid        logs/nginx.pid;  #指定进程文件的目录

events {
    #事件模型有:kqueue、rtsig、epoll、/dev/poll、select、poll
    #use epoll;  #指定参考事件模型,默认 epoll
    worker_connections  1024;  #每个worker进程的最大连接数
}

http {
    include       mime.types;  #指定nginx支持的媒体类型(conf/mime.types)
    default_type  application/octet-stream;  #指定默认的媒体类型

    #指定日志记录格式
    #log_format  main  '$remote_addr - $remote_user [$time_local] "$request" '
    #                  '$status $body_bytes_sent "$http_referer" '
    #                  '"$http_user_agent" "$http_x_forwarded_for"';

    #access_log  logs/access.log  main;  #指定nginx的访问日志路径

    sendfile        on;  #开启高效的文件传输模式
    #tcp_nopush     on;  #数据包累积到一定大小再发送,提升文件传输效率,防止网络阻塞

    #keepalive_timeout  0;  #连接超时时间,单位秒
    keepalive_timeout  65;

    #gzip  on;  #开启gzip压缩输出
    #gzip_min_length 1k;  #最小压缩文件大小
    #gzip_buffers 4 16k;  #压缩缓冲区的数量和大小
    #gzip_http_version 1.0;  #压缩版本(默认1.1,前端如果是squid2.5请使用1.0)
    #gzip_comp_level 2;  #压缩等级
    #gzip_types text/x-javascript text/css application/xml;  #压缩文件类型,默认 text/html
    #gzip_vary on;  #增加响应头“Vary: Accept-Encoding”

    #FastCGI程序相关参数
    #配置FastCGI程序相关参数是为了改善网站的性能:减少资源占用,提高访问速度。
    #fastcgi_connect_timeout 60;  #连接到后端fastcgi的超时时间
    #fastcgi_send_timeout 60;  #向fastcgi请求超时时间(超时设置在两次连续写入操作之间,而不是传输整个请求的过程。如果 FastCGI 服务器在此时间内没有收到任何内容,则连接将关闭。)
    #fastcgi_read_timeout 60;  #接收fastcgi应答超时时间,同理超时设置在两次连续读操作之间
    #fastcgi_buffer_size 8k;  #读取fastcgi应答第一部分需要多大缓冲区
    #fastcgi_buffers 4 8k;  #指定本地需要多少个和多大的缓冲区来缓冲fastcgi应答请求
    #fastcgi_busy_buffers_size 128k;  #当启用 FastCGI 服务器响应缓冲时,限制缓冲区的总大小,默认值是fastcgi_buffer的2倍
    #fastcgi_temp_file_write_size 128k;  #限制写入临时文件的数据 size(大小)
    #fastcgi_cache TEST;  #开启fastcgi缓存并为缓存的共享内存区域指定名称“TEST”
    #为不同的应答代码设置缓存时间,例如 200和302应答缓存为1个小时,301一天,其他1分钟
    #fastcgi_cache_valid 200 302 1h;
    #fastcgi_cache_valid 301 1d;
    #fastcgi_cache_valid any 1m;

    server {
        listen       80;  #侦听端口
        server_name  localhost;  #配置此主机的域名

        #charset koi8-r;  #配置字符编码

        #access_log  logs/host.access.log  main;  #配置默认访问日志路径

        location / {  #location区块 通过指定模式来与客户端请求的URI相匹配
            root   html;  #配置站点根目录
            index  index.html index.htm;  #默认文件
        }

        # root 与 alias 的区别( location path 会追加到 root path 后面 )
        location /vito {
            root   /home;  # http://localhost/vito/test.png -> /home/vito/test.png
        }
        location /static {
            alias   /home/vito;  # http://localhost/static/test.png -> /home/vito/test.png
        }

        # location = 等于号代表精准匹配
        location = /vito/test.png {
            root   /home;  # http://localhost/vito/test.png -> /home/vito/test.png
        }
        # location ^~ 以某个字符串开头
        location ^~ /vi {
            root   /home;  # http://localhost/vito/test.png -> /home/vito/test.png
        }
        # location ~ 正则表达式匹配
        location ~ \.(png|jpg|gif|jpeg|bpm) {
            root   /home;  # http://localhost/vito/test.png -> /home/vito/test.png
        }
        # location ~* 正则表达式匹配,不区分大小写
        location ~* \.(png|jpg|gif|jpeg|bpm) {
            root   /home;  # http://localhost/vito/test.PNG -> /home/vito/test.PNG
        }

        #error_page  404              /404.html;  #当发生404错误的时候显示的文件

        # redirect server error pages to the static page /50x.html
        #
        error_page   500 502 503 504  /50x.html;  #当发生其中错误码的时候显示的文件
        location = /50x.html {
            root   html;
        }

        #反向代理
        # proxy the PHP scripts to Apache listening on 127.0.0.1:80
        #
        #location ~ \.php$ {
        #    proxy_pass   http://127.0.0.1;  #指定代理地址
        #    proxy_redirect off;  #当上游服务器返回的响应是重定向或刷新请求(如HTTP响应码是301或者302)时,proxy_redirect可以重设HTTP头部的location或refresh字段

        #    后端的Web服务器可以通过X-Forwarded-For获取用户真实IP
        #    proxy_set_header X-Real-IP $remote_addr;
        #    proxy_set_header X-Forwarded-For $proxy_add_x_forwarded_for;
        #    proxy_set_header X-Forwarded-For $proxy_protocol_addr;
        #    proxy_set_header Host $host;

        # X-Forwarded-For 一般是每一个非透明代理转发请求时会将上游服务器的 IP 地址追加到 X-Forwarded-For 的后面,使用英文逗号分割
        # X-Real-IP 一般是最后一级代理将上游 IP 地址添加到该头中
        # X-Forwarded-For 是多个 IP 地址,而 X-Real-IP 是一个

        # $remote_addr 代表客户端 IP,如果请求经过多个代理,其值就是最后一个代理服务器的 IP,并不是真实客户端 IP
        # $proxy_add_x_forwarded_for 包含客户端请求头中的 "X-Forwarded-For",与 $remote_addr 用逗号分开。例如:客户端ip,代理1IP,代理2IP...
        # $proxy_protocol_addr 客户端源 IP 地址
        # $host 表示客户端请求头部中的 Host 字段
        #}

        # pass the PHP scripts to FastCGI server listening on 127.0.0.1:9000
        #
        #location ~ \.php$ {
        #    root           html;
        #    fastcgi_pass   127.0.0.1:9000;
        #    fastcgi_index  index.php;
        #    fastcgi_param  SCRIPT_FILENAME  /scripts$fastcgi_script_name;
        #    include        fastcgi_params;
        #}

        # deny access to .htaccess files, if Apache's document root
        # concurs with nginx's one
        #
        #location ~ /\.ht {
        #    deny  all;
        #}
    }


    # another virtual host using mix of IP-, name-, and port-based configuration
    #
    #server {
    #    listen       8000;
    #    listen       somename:8080;
    #    server_name  somename  alias  another.alias;

    #    location / {
    #        root   html;
    #        index  index.html index.htm;
    #    }
    #}


    # HTTPS server
    #
    #server {
    #    listen       443 ssl;
    #    server_name  localhost;

    #    ssl_certificate      cert.pem;
    #    ssl_certificate_key  cert.key;

    #    ssl_session_cache    shared:SSL:1m;
    #    ssl_session_timeout  5m;

    #    ssl_ciphers  HIGH:!aNULL:!MD5;
    #    ssl_prefer_server_ciphers  on;

    #    location / {
    #        root   html;
    #        index  index.html index.htm;
    #    }
    #}

}
Nginx 日志切割
1
2
3
4
5
6
7
8
9
10
11
12
13
14
15
16
17
18
19
[root@Nginx-1 ~]# vi /usr/local/nginx/sbin/cut_log.sh
#!/bin/bash
LOG_PATH="/var/log/nginx/"
# RECORD_TIME=$(date -d "yesterday" +%Y-%m-%d+%H:%M)
RECORD_TIME=$(date -d "yesterday" +%Y-%m-%d)
PID=/var/run/nginx.pid
mv ${LOG_PATH}/access.log ${LOG_PATH}/access.${RECORD_TIME}.log
mv ${LOG_PATH}/error.log ${LOG_PATH}/error.${RECORD_TIME}.lag
# 向 Nginx 主进程发送信号,用于重新创建日志文件
kill -USR1 `cat $PID`

[root@Nginx-1 ~]# chmod +x /usr/local/nginx/sbin/cut_log.sh

# 每日零点执行
[root@Nginx-1 ~]# crontab -e
0 0 * * * /usr/local/nginx/sbin/cut_log.sh

[root@Nginx-1 ~]# systemctl reload crond
[root@Nginx-1 ~]# systemctl restart crond
Cron 表达式:
| * | * | * | * | * | * | command |
|---|---|---|---|---|---|---|
| 分 | 时 | 日 | 月 | 周 | 年(可选) | 命令 |
跨域问题
- CORS 跨域资源共享
- Cross-Origin Resource Sharing
- 允许浏览器先跨Origin的服务发起 js 请求获取响应
- 跨域问题的解决方法
- Jsonp
- SpringBoot Cors
- Nginx
1
2
3
4
5
6
7
8
9
10
11
12
13
14
15
16
17
18
19
20
21
22
23
24
server {
    listen       80;
    server_name  localhost;

    # 允许跨域请求的域,*代表所有
    add_header 'Access-Control-Allow-Origin' *;
    # add_header 'Access-Control-Allow-Origin' 'http://nginx11.tk';
    # 允许带上 cookie 请求
    add_header 'Access-Control-Allow-Credentials' 'true';
    # 允许请求的方法,比如 GET/POST/PUT/DELETE
    add_header 'Access-Control-Allow-Methods' *;
    # add_header Access-Control-Allow-Methods GET,POST;
    # 允许请求的header
    add_header 'Access-Control-Alldw-Headers' *;

    location / {
        root   html;
        index  index.html index.htm;
    }

    location ^~ /vi {
        root   /home;  # http://localhost/vito/test.png -> /home/vito/test.png
    }
}
防盗链
1
2
3
4
5
6
7
8
9
10
11
12
13
14
15
16
17
18
19
server {
    listen       80;
    server_name  localhost;

    location / {
        root   html;
        index  index.html index.htm;
    }

    location ^~ /vit {
        # 对源站点进行验证
        valid_referers nginx1.tk *.nginx1.tk;
        # 非法引入
        if ($invalid_referer){
            return 403;
        }
        root   /home;
    }
}
使用 Nginx 搭建 Tomcat 集群
1
2
3
4
5
6
7
8
9
10
11
12
13
14
upstream tomcats {
    # 默认负载均衡策略:轮询
    server 192.168.23.21:8080;
    server 192.168.23.22:8080;
    server 192.168.23.23:8080;
}
server {
    listen 80;
    server_name tomcats.tk;  # tomcats.tk 指向 nginx

    location / {
        proxy_pass http://tomcats;
    }
}
负载均衡 - 加权轮询
1
2
3
4
5
6
upstream tomcats {
    # 每五次访问的轮询规律 21 22 23 22 23
    server 192.168.23.21:8080 weight=1;  # weight 默认值 = 1
    server 192.168.23.22:8080 weight=2;
    server 192.168.23.23:8080 weight=2;
}
upstream 的指令参数
1
2
3
4
5
upstream tomcats {
    server 192.168.23.21:8080 weight=10 max_conns=100 slow_start=60s max_fails=5 fail_timeout=30s;
    server 192.168.23.22:8080 weight=20 max_conns=200 down;
    server 192.168.23.23:8080 weight=20 max_conns=200 backup;
}
max_conns: 限制最大连接数,默认值0,表示无限制。slow_start: 当服务器从不健康变成健康,或者服务器从被标记为不可达变成可达后,在 slow_start 设置的时间段内服务器权重将从零逐渐恢复到正常值。默认值0,表示关闭缓慢启动功能。(目前商业版才能使用该参数,需搭配权重 weight 一起使用,并且至少要有2个server)down: 标记该 server 为不可用状态。backup: 标记该 server 为备用服务器,当其他 server 都不可用时,请求才会被分发到该 server 。max_fails: 默认值1,如果设置为0,则关闭尝试计数,认为 server 是一直可用的。fail_timeout: 默认值 10s ,max_fails 与 fail_timeout 需搭配使用- 如果设置为 max_fails=5 fail_timeout=30s ,表示如果在 30s 内累计有 5 次请求失败,则该服务器被断定为不可达,之后的 30s 将不会再有请求到达这台服务器。
keepalive 长连接
1
2
3
4
5
6
7
8
9
10
11
12
13
14
15
16
17
 upstream tomcats {
     server 192.168.23.21:8080;
     server 192.168.23.22:8080;
     server 192.168.23.23:8080;

     keepalive 16;  # Nginx 每个 worker 连接后端的最大长连接数
 }
 server {
     listen 80;
     server_name tomcats.tk;

     location / {
         proxy_pass http://tomcats;
         proxy_http_version 1.1;
         proxy_set_header Connection "";
     }
 }
负载均衡 - ip_hash
1
2
3
4
5
6
7
upstream tomcats {
    ip_hash;

    server 192.168.23.21:8080;
    server 192.168.23.22:8080;
    server 192.168.23.23:8080;
}
- hash(client_ip) % node_counts = index
- 来自同一个 ip 的请求会被分发到同一个 server
- 当某个 server 不可用时,不要把它从 upstream 中移除,而是要标记其为 down ;被分发到该 server 的请求会根据当前的哈希值再哈希出一个新哈希值,选择另一个服务器去尝试
- 使用 ip_hash 负载均衡算法,server 权重 weight 将失去作用
负载均衡 - url hash
1
2
3
4
5
6
7
upstream tomcats {
    hash $request_uri;

    server 192.168.23.21:8080;
    server 192.168.23.22:8080;
    server 192.168.23.23:8080;
}
- hash(url) % node_counts = index
- 如果分发到某个 server 的请求特别多,可以将该 server 指向另一个 nginx ,然后由此 nginx 将请求再次分发到新的集群
负载均衡 - least_conn
1
2
3
4
5
6
7
upstream tomcats {
    least_conn;

    server 192.168.23.21:8080;
    server 192.168.23.22:8080;
    server 192.168.23.23:8080;
}
- 新的请求会被分发到连接数最少的 server
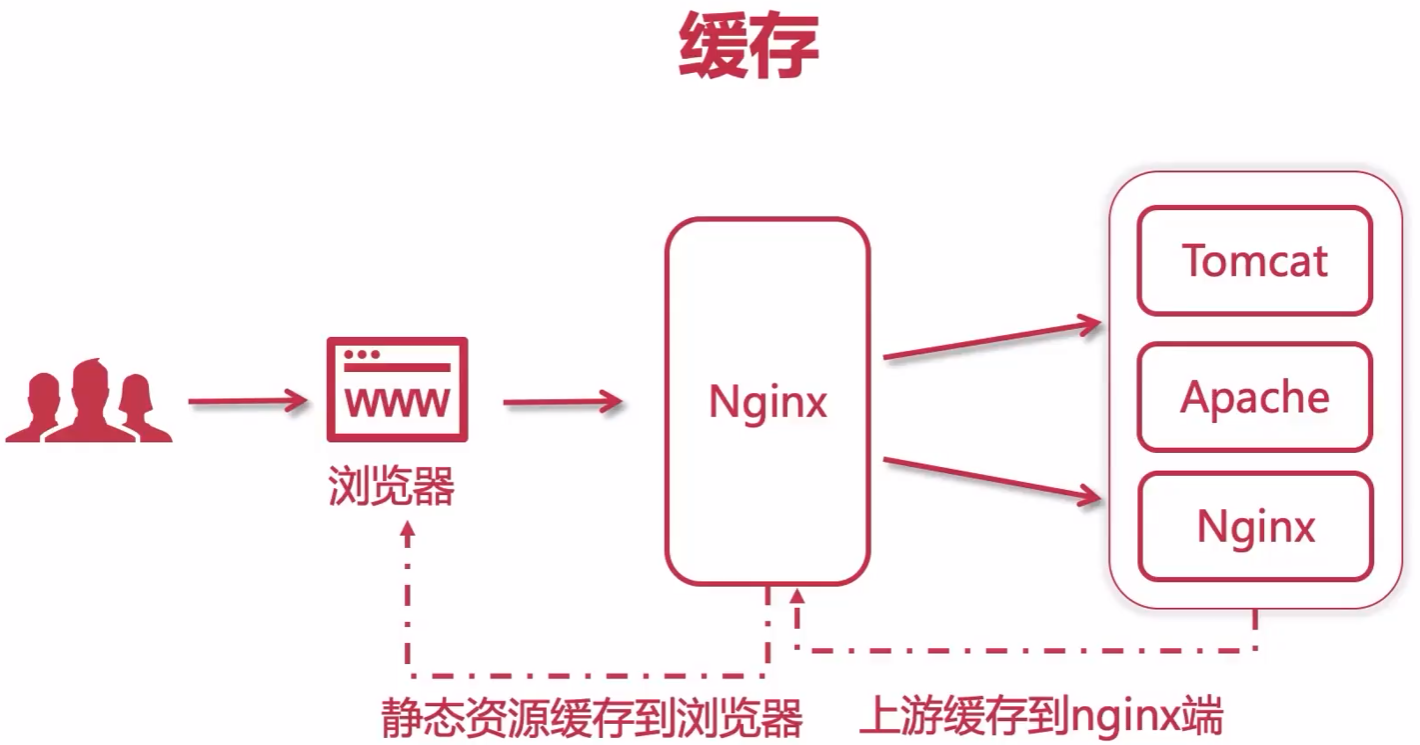
缓存
Nginx 控制浏览器缓存 expires
1
2
3
4
5
6
7
8
9
10
11
12
13
14
15
server {
    listen       80;
    server_name  localhost;

    location / {
        root   /home;

        # expires off; # 默认值
        # expires max; # Cache-Control:max-age=315360000
        # expires 10s; # 缓存 10s
        # expires @22h30m; # 晚上十点半缓存过期
        # expires -1; # 指定过期时间为上1s,即不缓存
        # expires epoch; # 指定“Expires”的值为 1 January,1970,00:00:01 GMT,即不缓存
    }
}
Nginx 的反向代理缓存
1
2
3
4
5
6
7
8
9
10
11
12
13
14
15
16
17
18
19
20
21
upstream tomcats {
    server 192.168.23.21:8080;
    server 192.168.23.22:8080;
    server 192.168.23.23:8080;
}

proxy_cache_path /home/vito/nginx/cache/tomcats keys_zone=tomcats_cache:10m max_size=1g inactive=7d use_temp_path=off;

server {
    listen 80;
    server_name tomcats.tk;

    # 开启缓存
    proxy_cache tomcats_cache;
    # 设置 200、304 响应码的内容的有效期(expires)
    proxy_cache_valid 200 304 12h;

    location / {
        proxy_pass http://tomcats;
    }
}
proxy_cache_path:缓存保存的目录keys_zone:指定一个共享内存空间 zone,所有活动的key和缓存数据相关的信息都被存放在共享内存中,这样 nginx 可以快速判断一个 request 是否命中或者未命中缓存,1m 可以存储 8000 个 key,10m 可以存储 80000 个key;inactive:在指定时间内没有被访问的缓存文件会被 cache manager 删除,inactive 的默认值是10分钟。 需要注意的是,inactive 和 expired 配置项的含义是不同的,expired 只是缓存过期,但不会被删除,inactive 是删除指定时间内未被访问的缓存文件。max_size:缓存空间的总大小,如果不指定,会用掉所有磁盘空间,当大小超过,将会基于 LRU 算法移除数据,以减少占用大小。nginx 启动时,会创建一个 “Cache manager” 进程,通过 “purge” 方式移除数据。loader_files:“cache loader” 进程遍历文件时,每次加载的文件个数,默认为100 。loader_threshold:每次遍历消耗时间上限;默认为 200 毫秒。loader_sleep:一次遍历之后,停顿的时间间隔,默认为 50 毫秒。proxy_temp_path:缓存的响应首先写入临时文件,然后重命名该文件。建议缓存和保存临时文件的目录都放在同一文件系统上。use_temp_path:默认值 on ; 设置为 off 表示临时文件将直接放入缓存目录中。
配置 SSL 证书
- 准备证书
1
2
3
4
5
6
7
8
9
10
11
12
13
14
15
16
17
18
19
20
21
22
23
24
25
26
27
28
29
30
31
# 让用户 vito 执行命令 " sudo systemctl force-reload nginx " 时不需要输入密码
[root@Nginx-1 ~]# visudo
root    ALL=(ALL)       ALL
vito    ALL=(ALL)       ALL, NOPASSWD: /usr/bin/systemctl force-reload nginx

# 安装 acme.sh
[vito@Nginx-1 ~]$ curl https://get.acme.sh | sh -s email=hczhch@gmail.com
[vito@Nginx-1 ~]$ alias acme.sh=~/.acme.sh/acme.sh

# 自动更新 acme.sh
[vito@Nginx-1 ~]$ acme.sh --upgrade --auto-upgrade

# 签发证书
[vito@Nginx-1 ~]$ export DP_Id="351937"
[vito@Nginx-1 ~]$ export DP_Key="c0d8b77186364909d3c0************"
[vito@Nginx-1 ~]$ mkdir -p /home/vito/cert
[vito@Nginx-1 ~]$ acme.sh --issue --dns dns_dp --keylength ec-256 \
    -d vito.tk -d *.vito.tk -d *.frp.vito.tk \
    --renew-hook "/home/vito/.acme.sh/acme.sh \
    --install-cert -d vito.tk --ecc \
    --fullchain-file /home/vito/cert/vito.tk.fullchain.crt \
    --key-file /home/vito/cert/vito.tk.key \
    --reloadcmd \"sudo systemctl force-reload nginx\""

# ec-256 指明了证书为ECC证书
# --ecc : ECC cert 需要该参数

# 安装证书
[vito@Nginx-1 ~]$ acme.sh --install-cert -d vito.tk --ecc \
    --fullchain-file /home/vito/cert/vito.tk.fullchain.crt \
    --key-file /home/vito/cert/vito.tk.key
- 给 Nginx 添加 ssl 模块
1
2
3
4
5
6
7
8
9
10
11
12
13
14
15
16
17
18
19
20
21
22
23
24
# 查看编译后的 nginx 源码文件 objs/ngx_modules.c ,会发现里面没有 ssl 模块
[root@Nginx-1 objs]# vim /home/vito/software/nginx-1.24.0/objs/ngx_modules.c

# 查看原编译参数
[root@Nginx-1 vito]# nginx -V
nginx version: nginx/1.24.0
built by gcc 11.3.1 20221121 (Red Hat 11.3.1-4) (GCC)
configure arguments: --prefix=/usr/local/nginx --pid-path=/var/run/nginx.pid --lock-path=/var/lock/nginx.lock --error-log-path=/var/log/nginx/error.log --http-log-path=/var/log/nginx/access.log --with-http_gzip_static_module --http-client-body-temp-path=/var/temp/nginx/client --http-proxy-temp-path=/var/temp/nginx/proxy --http-fastcgi-temp-path=/var/temp/nginx/fastcgi --http-uwsgi-temp-path=/var/temp/nginx/uwsgi --http-scgi-temp-path=/var/temp/nginx/scgi

# 重新编译
[root@Nginx-1 nginx-1.24.0]# cd /home/vito/software/nginx-1.24.0
[root@Nginx-1 nginx-1.24.0]# ./configure \
--prefix=/usr/local/nginx --pid-path=/var/run/nginx.pid --lock-path=/var/lock/nginx.lock --error-log-path=/var/log/nginx/error.log --http-log-path=/var/log/nginx/access.log --with-http_gzip_static_module --http-client-body-temp-path=/var/temp/nginx/client --http-proxy-temp-path=/var/temp/nginx/proxy --http-fastcgi-temp-path=/var/temp/nginx/fastcgi --http-uwsgi-temp-path=/var/temp/nginx/uwsgi --http-scgi-temp-path=/var/temp/nginx/scgi \
--with-http_ssl_module \
--with-http_v2_module
[root@Nginx-1 nginx-1.24.0]# make
[root@Nginx-1 nginx-1.24.0]# make install

[root@Nginx-1 nginx-1.24.0]# nginx -V
nginx version: nginx/1.24.0
built by gcc 11.3.1 20221121 (Red Hat 11.3.1-4) (GCC)
built with OpenSSL 3.0.7 1 Nov 2022
TLS SNI support enabled
configure arguments: --prefix=/usr/local/nginx --pid-path=/var/run/nginx.pid --lock-path=/var/lock/nginx.lock --error-log-path=/var/log/nginx/error.log --http-log-path=/var/log/nginx/access.log --with-http_gzip_static_module --http-client-body-temp-path=/var/temp/nginx/client --http-proxy-temp-path=/var/temp/nginx/proxy --http-fastcgi-temp-path=/var/temp/nginx/fastcgi --http-uwsgi-temp-path=/var/temp/nginx/uwsgi --http-scgi-temp-path=/var/temp/nginx/scgi --with-http_ssl_module --with-http_v2_module
- 配置 HTTPS
1
2
3
4
5
6
7
8
9
10
11
12
13
14
15
16
17
18
[root@Nginx-1 ~]# vim /usr/local/nginx/conf/nginx.conf

server {
    listen       443 ssl http2;
    server_name  vito.tk;

    ssl_certificate "/home/vito/cert/vito.tk.fullchain.crt";
    ssl_certificate_key "/home/vito/cert/vito.tk.key";
    ssl_session_cache shared:SSL:1m;
    ssl_session_timeout  10m;
    ssl_ciphers HIGH:!aNULL:!MD5;
    ssl_prefer_server_ciphers on;

    location / {
        root   html;
        index  index.html index.htm;
    }
}
Linux 自建 DNS Serve
- 说明
-
搭建 DNS Server 的服务器的 IP 是:192.168.23.100
-
DNS 服务器要解析的域是 vito.lan.
-
将域名 vito.lan 解析到两个虚拟IP 192.168.23.111 和 192.168.23.112 , 为搭建 Nginx 双主热备做准备
-
- 防火墙
1
2
[root@dns-server ~]# firewall-cmd --permanent --zone=public --add-service=dns
[root@dns-server ~]# firewall-cmd --reload
- 安装 bind
1
[root@dns-server ~]# yum -y install bind bind-utils bind-chroot
- 修改 /etc/named.conf
1
2
3
4
5
6
7
8
[root@dns-server ~]# vim /etc/named.conf
options {
        listen-on port 53 { any; }; # 设置named监听的端口号、IP地址(any表示 DNS 服务器上的所有IP地址均可提供DNS域名解析服务)
        listen-on-v6 port 53 { any; };
        allow-query     { 127.0.0.0/8; 192.168.3.0/24; 192.168.23.0/24; };  # 或者 allow-query { any; }; 允许对本服务器发送DNS查询请求的IP范围
        forwarders      { 119.29.29.29; 180.76.76.76; 1.1.1.1; }; # 将本地DNS没有配置的域名转发给其他DNS解析(配置文件默认没有该行内容)

        dnssec-validation no; # 由 yes 改为 no , yes | no | auto
- 让 named 只运行在 IPv4 模式下
1
2
3
[root@dns-server ~]# vim /etc/sysconfig/named
# 在文件末尾新增如下内容
OPTIONS="-4"
- 修改 /etc/named.rfc1912.zones 文件,在末尾添加如下内容:
- 为什么是 named.rfc1912.zones ,请查看 /etc/named.conf
- 其实也可以新增一个 zones 文件,然后在 /etc/named.conf 中引用它
1
2
3
4
5
6
7
8
9
10
11
12
13
14
[root@dns-server ~]# vim /etc/named.rfc1912.zones
# 正向区域配置 域名->IP
zone "vito.lan" IN {
        type master;
        file "named.vito.lan.zone"; # 正向区域地址数据库文件
        allow-update { none; };
};

# 反向区域配置 IP->域名
zone "23.168.192.in-addr.arpa" IN { # 反向区域的名称由倒序的网络地址和“.in-addr.arpa”组合而成
        type master;
        file "named.192.168.23.arpa"; # 反向区域地址数据库文件
        allow-update { none; };
};
- 配置正向区域地址数据库文件
1
2
3
4
5
6
7
8
9
10
11
12
13
14
15
16
17
18
19
20
21
22
23
24
25
26
27
28
29
30
31
32
[root@dns-server ~]# cd /var/named
[root@dns-server named]# cp -p named.localhost named.vito.lan.zone
[root@dns-server named]# vim named.vito.lan.zone
$TTL 1D
@       IN SOA  @ admin.vito.lan. (
                                        0       ; serial
                                        1D      ; refresh
                                        1H      ; retry
                                        1W      ; expire
                                        3H )    ; minimum
@       IN  NS      ns1.vito.lan.
ns1     IN  A       192.168.23.100
@       IN  A       192.168.23.111
@       IN  A       192.168.23.112
www     IN  CNAME   @
nginx1  IN  A       192.168.23.131
nginx2  IN  A       192.168.23.132

# @ 代表 zone, 也就是 vito.lan.
# SOA 为 Start of Authority Record,后面必须紧接着 Primary Name Server(vito.lan. / @) 和管理者的 e-mail(admin.vito.lan. -> admin@vito.lan. @有特殊含义,用点好代替)

# A:将域名指向一个IPv4地址
# CNAME:如果将域名指向另一个域名
# AAAA:将域名指向一个IPv6地址
# PTR:反向解析记录
# NS:域名服务器记录,可将指定域名交由其他 DNS 服务商解析管理

# serial : 序列号,最长10位,即主DNS数据库的版本号,主服务器数据库内容发生变化时,其版本号需要递增,从服务器会对比与主服务器的数据库版本号,一样的版本号就不需要更新,否则需要更新
# refresh : 从服务器每多久到主服务器检查序列号的变化
# retry : 从服务器到服务器请求同步解析库失败时,再次发起解析请求的时间间隔
# expire : 从服务器始终联系不到主服务器时,多久之后放弃从主服务器同步数据,超过此时间后,从服务器也将停止解析
# minimum : negative answer 否定答案的缓存时长
- 配置反向区域地址数据库文件
1
2
3
4
5
6
7
8
9
10
11
12
13
14
15
16
17
18
19
20
[root@dns-server ~]# cd /var/named
[root@dns-server named]# cp -p named.localhost named.192.168.23.arpa
[root@dns-server named]# vim named.192.168.23.arpa
$TTL 1D
@	IN SOA	vito.lan. admin.vito.lan. (
					0	; serial
					1D	; refresh
					1H	; retry
					1W	; expire
					3H )	; minimum
@       IN  NS      ns1.vito.lan.
100     IN  PTR     ns1.vito.lan.
111     IN  PTR     vito.lan.
111     IN  PTR     www.vito.lan.
112     IN  PTR     vito.lan.
112     IN  PTR     www.vito.lan.
131     IN  PTR     nginx1.vito.lan.
132     IN  PTR     nginx2.vito.lan.

# @ 代表 zone, 也就是 23.168.192.in-addr.arpa.
- 检查配置文件
1
[root@dns-server ~]# named-checkconf -z /etc/named.conf
- 开机启动
1
[root@dns-server ~]# systemctl enable named
- 修改本机 DNS
1
2
3
4
5
6
7
8
9
10
11
12
13
14
15
16
17
# 查看网卡
[root@dns-server ~]# nmcli connection show
NAME   UUID                                  TYPE      DEVICE
ens33  a339fd6f-a9b7-4ebc-a265-228e22d280f6  ethernet  ens33
lo     764f4a85-9f82-4fac-b069-a1530ebd9915  loopback  lo

# 修改网卡的DNS
[root@dns-server ~]# nmcli con mod ens33 ipv4.dns "192.168.23.100 1.1.1.1"

# 重启网卡
[root@dns-server ~]# systemctl restart NetworkManager

# 查看DNS是否生效
[root@dns-server ~]# cat /etc/resolv.conf
# Generated by NetworkManager
nameserver 192.168.23.100
nameserver 1.1.1.1
- 验证
1
2
3
4
5
6
7
8
9
10
11
12
13
14
15
16
17
18
19
20
[root@dns-server ~]# nslookup
> vito.lan
Server:		192.168.23.100
Address:	192.168.23.100#53

Name:	vito.lan
Address: 192.168.23.111
Name:	vito.lan
Address: 192.168.23.112
>
> nginx1.vito.lan
Server:		192.168.23.100
Address:	192.168.23.100#53

Name:	nginx1.vito.lan
Address: 192.168.23.131
>
> 192.168.23.132
132.23.168.192.in-addr.arpa	name = nginx2.vito.lan.
>
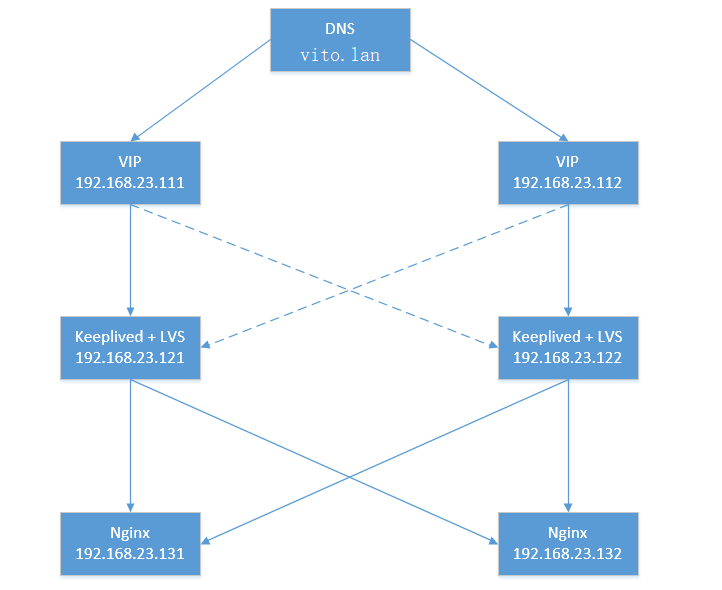
Nginx 高可用 – Keepalived + LVS
-
架构图
- VIP 111 的主节点是 121 ,备用节点是 122
- VIP 112 的主节点是 122 ,备用节点是 121
- 使用两个 VIP ,避免备用 LVS 长期处于空闲状态
- 如果 DNS 直接将域名解析到两个 Nginx ,会缺少节点心跳检测、故障自动剔除等功能
- 防火墙
1
2
3
4
5
6
7
8
9
10
11
12
# LVS 服务器:允许 VRRP 流量在节点之间通过 keepalived
[root@lvs-1 ~]# firewall-cmd --add-rich-rule='rule protocol value="vrrp" accept' --permanent
[root@lvs-1 ~]# firewall-cmd --reload
[root@lvs-2 ~]# firewall-cmd --add-rich-rule='rule protocol value="vrrp" accept' --permanent
[root@lvs-2 ~]# firewall-cmd --reload

[root@lvs-1 ~]# firewall-cmd --permanent --zone=public --add-service=http
[root@lvs-1 ~]# firewall-cmd --permanent --zone=public --add-service=https
[root@lvs-1 ~]# firewall-cmd --reload
[root@lvs-2 ~]# firewall-cmd --permanent --zone=public --add-service=http
[root@lvs-2 ~]# firewall-cmd --permanent --zone=public --add-service=https
[root@lvs-2 ~]# firewall-cmd --reload
- 安装 Keepalived
1
2
3
# https://www.keepalived.org/
[root@lvs-1 ~]# yum install -y keepalived
[root@lvs-2 ~]# yum install -y keepalived
- 开机自动启动
1
2
[root@lvs-1 ~]# systemctl enable keepalived
[root@lvs-2 ~]# systemctl enable keepalived
- 编辑配置文件
1
2
3
4
5
6
7
8
9
10
11
12
13
14
15
16
17
18
19
20
21
22
23
24
25
26
27
28
29
30
31
32
33
34
35
36
37
38
39
40
41
42
43
44
45
46
47
48
49
50
51
52
53
54
55
56
57
58
59
60
61
62
63
64
65
66
67
68
69
70
71
72
73
74
75
76
77
78
79
80
81
82
83
84
85
86
87
88
89
90
91
92
93
94
95
96
97
98
99
100
101
102
103
104
105
106
107
108
109
110
111
112
# 第一台
[root@lvs-1 ~]# vim /etc/keepalived/keepalived.conf
! Configuration File for keepalived

global_defs {
   # 路由ID,全局唯一
   router_id LVS_DEVEL_121
   # lvs_timeouts [tcp SECS] [tcpfin SECS] [udp SECS]
   lvs_timeouts tcp 900 tcpfin 120 udp 300
   # lvs_sync_daemon <INTERFACE> [[inst] <VRRP_INSTANCE>]
   lvs_sync_daemon ens33 VI_111,VI_112
}

vrrp_instance VI_111 {
    state MASTER
    # 虚拟IP绑定的网卡
    interface ens33
    # 主备节点的 virtual_router_id 要一致
    virtual_router_id 111
    # 权重,当 Master 宕掉后,权重大的 Backup 会成为新的 Master
    priority 100
    # 主备之间同步检查的时间间隔,单位秒
    advert_int 1
    authentication {
        auth_type PASS
        # 主备节点的 auth_pass 要一致
        auth_pass A111
    }
    virtual_ipaddress {
        # 虚拟IP
        192.168.23.111
    }
}

# 虚拟服务器的访问 ip 和 端口(端口与 nginx 保持一致)
virtual_server 192.168.23.111 80 {
    # 健康检查的时间间隔,单位秒
    delay_loop 6
    # 负载均衡算法,rr 轮询
    lb_algo rr
    # 设置 LVS 的模式,NAT | TUN | DR
    lb_kind DR
    # 会话持久化的时间,单位秒
    persistence_timeout 50
    protocol TCP

    real_server 192.168.23.131 80 {
        weight 1
        # 健康检查
        TCP_CHECK {
            # 检查的端口
            connect_port 80
            # 超时时间
            connect_timeout 2
            # 重试次数
            nb_get_retry 3
            # 重试间隔时间
            delay_before_retry 3
        }
    }
    real_server 192.168.23.132 80 {
        weight 1
        TCP_CHECK {
            connect_port 80
            connect_timeout 2
            nb_get_retry 3
            delay_before_retry 3
        }
    }
}

vrrp_instance VI_112 {
    state BACKUP
    interface ens33
    virtual_router_id 112
    priority 50
    advert_int 1
    authentication {
        auth_type PASS
        auth_pass A222
    }
    virtual_ipaddress {
        192.168.23.112
    }
}

virtual_server 192.168.23.112 80 {
    delay_loop 6
    lb_algo rr
    lb_kind DR
    persistence_timeout 50
    protocol TCP

    real_server 192.168.23.131 80 {
        weight 1
        TCP_CHECK {
            connect_port 80
            connect_timeout 2
            nb_get_retry 3
            delay_before_retry 3
        }
    }
    real_server 192.168.23.132 80 {
        weight 1
        TCP_CHECK {
            connect_port 80
            connect_timeout 2
            nb_get_retry 3
            delay_before_retry 3
        }
    }
}
1
2
3
4
5
6
7
8
9
10
11
12
13
14
15
16
17
18
19
20
21
22
23
24
25
26
27
28
29
30
31
32
33
34
35
36
37
38
39
40
41
42
43
44
45
46
47
48
49
50
51
52
53
54
55
56
57
58
59
60
61
62
63
64
65
66
67
68
69
70
71
72
73
74
75
76
77
78
79
80
81
82
83
84
85
86
87
88
89
90
91
92
93
# 第二台
[root@lvs-2 ~]# vim /etc/keepalived/keepalived.conf
! Configuration File for keepalived

global_defs {
   router_id LVS_DEVEL_122
   lvs_timeouts tcp 900 tcpfin 120 udp 300
   lvs_sync_daemon ens33 VI_111,VI_112
}

vrrp_instance VI_111 {
    state BACKUP
    interface ens33
    virtual_router_id 111
    priority 50
    advert_int 1
    authentication {
        auth_type PASS
        auth_pass A111
    }
    virtual_ipaddress {
        192.168.23.111
    }
}

virtual_server 192.168.23.111 80 {
    delay_loop 6
    lb_algo rr
    lb_kind DR
    persistence_timeout 50
    protocol TCP

    real_server 192.168.23.131 80 {
        weight 1
        TCP_CHECK {
            connect_port 80
            connect_timeout 2
            nb_get_retry 3
            delay_before_retry 3
        }
    }
    real_server 192.168.23.132 80 {
        weight 1
        TCP_CHECK {
            connect_port 80
            connect_timeout 2
            nb_get_retry 3
            delay_before_retry 3
        }
    }
}

vrrp_instance VI_112 {
    state MASTER
    interface ens33
    virtual_router_id 112
    priority 100
    advert_int 1
    authentication {
        auth_type PASS
        auth_pass A222
    }
    virtual_ipaddress {
        192.168.23.112
    }
}

virtual_server 192.168.23.112 80 {
    delay_loop 6
    lb_algo rr
    lb_kind DR
    persistence_timeout 50
    protocol TCP

    real_server 192.168.23.131 80 {
        weight 1
        TCP_CHECK {
            connect_port 80
            connect_timeout 2
            nb_get_retry 3
            delay_before_retry 3
        }
    }
    real_server 192.168.23.132 80 {
        weight 1
        TCP_CHECK {
            connect_port 80
            connect_timeout 2
            nb_get_retry 3
            delay_before_retry 3
        }
    }
}
- 启动 Keepalived
1
2
[root@lvs-1 ~]# systemctl start keepalived
[root@lvs-2 ~]# systemctl start keepalived
- 查看 VIP 绑定情况
1
2
3
4
5
6
7
8
9
10
11
12
13
14
15
16
[root@lvs-1 ~]# ip addr
1: lo: <LOOPBACK,UP,LOWER_UP> mtu 65536 qdisc noqueue state UNKNOWN group default qlen 1000
    link/loopback 00:00:00:00:00:00 brd 00:00:00:00:00:00
    inet 127.0.0.1/8 scope host lo
       valid_lft forever preferred_lft forever
    inet6 ::1/128 scope host
       valid_lft forever preferred_lft forever
2: ens33: <BROADCAST,MULTICAST,UP,LOWER_UP> mtu 1500 qdisc fq_codel state UP group default qlen 1000
    link/ether 00:0c:29:f3:45:e4 brd ff:ff:ff:ff:ff:ff
    altname enp2s1
    inet 192.168.23.121/24 brd 192.168.23.255 scope global noprefixroute ens33
       valid_lft forever preferred_lft forever
    inet 192.168.23.111/32 scope global ens33
       valid_lft forever preferred_lft forever
    inet6 fe80::20c:29ff:fef3:45e4/64 scope link noprefixroute
       valid_lft forever preferred_lft forever
1
2
3
4
5
6
7
8
9
10
11
12
13
14
15
16
[root@lvs-2 ~]# ip addr
1: lo: <LOOPBACK,UP,LOWER_UP> mtu 65536 qdisc noqueue state UNKNOWN group default qlen 1000
    link/loopback 00:00:00:00:00:00 brd 00:00:00:00:00:00
    inet 127.0.0.1/8 scope host lo
       valid_lft forever preferred_lft forever
    inet6 ::1/128 scope host
       valid_lft forever preferred_lft forever
2: ens33: <BROADCAST,MULTICAST,UP,LOWER_UP> mtu 1500 qdisc fq_codel state UP group default qlen 1000
    link/ether 00:0c:29:ba:01:74 brd ff:ff:ff:ff:ff:ff
    altname enp2s1
    inet 192.168.23.122/24 brd 192.168.23.255 scope global noprefixroute ens33
       valid_lft forever preferred_lft forever
    inet 192.168.23.112/32 scope global ens33
       valid_lft forever preferred_lft forever
    inet6 fe80::20c:29ff:feba:174/64 scope link noprefixroute
       valid_lft forever preferred_lft forever
- ipvsadm
1
2
3
4
5
6
7
8
9
10
11
[root@lvs-1 ~]# yum install -y ipvsadm
[root@lvs-1 ~]# ipvsadm -Ln
IP Virtual Server version 1.2.1 (size=4096)
Prot LocalAddress:Port Scheduler Flags
  -> RemoteAddress:Port           Forward Weight ActiveConn InActConn
TCP  192.168.23.111:80 rr persistent 50
  -> 192.168.23.131:80            Route   1      0          0
  -> 192.168.23.132:80            Route   1      0          0
TCP  192.168.23.112:80 rr persistent 50
  -> 192.168.23.131:80            Route   1      0          0
  -> 192.168.23.132:80            Route   1      0          0
- Real Server 设置 ARP 参数,确保 LVS DR 能够正常转发
1
2
3
4
5
6
7
8
9
10
11
12
13
14
15
16
17
[root@Nginx-1 ~]# vim /etc/sysctl.conf
net.ipv4.conf.all.arp_ignore = 1
net.ipv4.conf.default.arp_ignore = 1
net.ipv4.conf.lo.arp_ignore = 1
net.ipv4.conf.all.arp_announce = 2
net.ipv4.conf.default.arp_announce = 2
net.ipv4.conf.lo.arp_announce = 2
[root@Nginx-1 ~]# sysctl -p

[root@Nginx-2 ~]# vim /etc/sysctl.conf
net.ipv4.conf.all.arp_ignore = 1
net.ipv4.conf.default.arp_ignore = 1
net.ipv4.conf.lo.arp_ignore = 1
net.ipv4.conf.all.arp_announce = 2
net.ipv4.conf.default.arp_announce = 2
net.ipv4.conf.lo.arp_announce = 2
[root@Nginx-2 ~]# sysctl -p
- Real Server 绑定 VIP ,并设置路由
1
2
3
4
5
6
7
8
9
10
11
12
13
14
15
16
17
18
19
20
21
22
23
24
25
26
27
28
29
30
31
32
33
34
35
36
37
38
39
40
41
42
43
44
45
[root@Nginx-1 ~]# ifconfig lo:0 192.168.23.111/32 up
[root@Nginx-1 ~]# ifconfig lo:1 192.168.23.112/32 up
[root@Nginx-1 ~]# route add -host 192.168.23.111 dev lo:0
[root@Nginx-1 ~]# route add -host 192.168.23.112 dev lo:1

[root@Nginx-2 ~]# ifconfig lo:0 192.168.23.111/32 up
[root@Nginx-2 ~]# ifconfig lo:1 192.168.23.112/32 up
[root@Nginx-2 ~]# route add -host 192.168.23.111 dev lo:0
[root@Nginx-2 ~]# route add -host 192.168.23.112 dev lo:1

# 以上指令在服务器重启后失效,将它们添加到开机启动脚本
# 首先编辑 rc-local.service 文件,新增如下内容
[root@Nginx-1 ~]# vi /usr/lib/systemd/system/rc-local.service
[Install]
WantedBy=multi-user.target

# 设置 rc-local 开机启动
[root@Nginx-1 ~]# systemctl enable rc-local

# 给 rc.local 文件赋权
[root@Nginx-1 ~]# ll /etc/rc.local
lrwxrwxrwx. 1 root root 13  9月 27 16:19 /etc/rc.local -> rc.d/rc.local
[root@Nginx-1 ~]# ll /etc/rc.d/rc.local
-rw-r--r--. 1 root root 623 11月 28 08:52 /etc/rc.d/rc.local
[root@Nginx-1 ~]# chmod u+x /etc/rc.d/rc.local
[root@Nginx-1 ~]# ll /etc/rc.d/rc.local
-rwxr--r--. 1 root root 623 11月 28 08:52 /etc/rc.d/rc.local

# 将指令添加到 rc.local 文件中
[root@Nginx-1 ~]# vim /etc/rc.local
ifconfig lo:0 192.168.23.111/32 up
ifconfig lo:1 192.168.23.112/32 up
route add -host 192.168.23.111 dev lo:0
route add -host 192.168.23.112 dev lo:1

[root@Nginx-2 ~]# vi /usr/lib/systemd/system/rc-local.service
[Install]
WantedBy=multi-user.target
[root@Nginx-2 ~]# systemctl enable rc-local
[root@Nginx-2 ~]# chmod u+x /etc/rc.d/rc.local
[root@Nginx-2 ~]# vim /etc/rc.local
ifconfig lo:0 192.168.23.111/32 up
ifconfig lo:1 192.168.23.112/32 up
route add -host 192.168.23.111 dev lo:0
route add -host 192.168.23.112 dev lo:1
- 查看 Real Server 网络信息
1
2
3
4
5
6
7
8
9
10
11
12
13
14
15
16
17
18
19
20
21
22
23
24
25
26
27
28
29
30
31
32
33
34
35
36
37
38
39
40
41
42
43
44
45
46
47
48
49
50
51
52
53
[root@Nginx-1 ~]# ip addr
1: lo: <LOOPBACK,UP,LOWER_UP> mtu 65536 qdisc noqueue state UNKNOWN group default qlen 1000
    link/loopback 00:00:00:00:00:00 brd 00:00:00:00:00:00
    inet 127.0.0.1/8 scope host lo
       valid_lft forever preferred_lft forever
    inet 192.168.23.111/0 scope global lo:0
       valid_lft forever preferred_lft forever
    inet 192.168.23.112/0 scope global secondary lo:1
       valid_lft forever preferred_lft forever
    inet6 ::1/128 scope host
       valid_lft forever preferred_lft forever
2: ens33: <BROADCAST,MULTICAST,UP,LOWER_UP> mtu 1500 qdisc fq_codel state UP group default qlen 1000
    link/ether 00:0c:29:e9:b3:a9 brd ff:ff:ff:ff:ff:ff
    altname enp2s1
    inet 192.168.23.131/24 brd 192.168.23.255 scope global noprefixroute ens33
       valid_lft forever preferred_lft forever
    inet6 fe80::20c:29ff:fee9:b3a9/64 scope link noprefixroute
       valid_lft forever preferred_lft forever

[root@Nginx-1 ~]# ifconfig
ens33: flags=4163<UP,BROADCAST,RUNNING,MULTICAST>  mtu 1500
        inet 192.168.23.131  netmask 255.255.255.0  broadcast 192.168.23.255
        inet6 fe80::20c:29ff:fee9:b3a9  prefixlen 64  scopeid 0x20<link>
        ether 00:0c:29:e9:b3:a9  txqueuelen 1000  (Ethernet)
        RX packets 515  bytes 38589 (37.6 KiB)
        RX errors 0  dropped 0  overruns 0  frame 0
        TX packets 333  bytes 30755 (30.0 KiB)
        TX errors 0  dropped 0 overruns 0  carrier 0  collisions 0

lo: flags=73<UP,LOOPBACK,RUNNING>  mtu 65536
        inet 127.0.0.1  netmask 255.0.0.0
        inet6 ::1  prefixlen 128  scopeid 0x10<host>
        loop  txqueuelen 1000  (Local Loopback)
        RX packets 0  bytes 0 (0.0 B)
        RX errors 0  dropped 0  overruns 0  frame 0
        TX packets 0  bytes 0 (0.0 B)
        TX errors 0  dropped 0 overruns 0  carrier 0  collisions 0

lo:0: flags=73<UP,LOOPBACK,RUNNING>  mtu 65536
        inet 192.168.23.111  netmask 0.0.0.0
        loop  txqueuelen 1000  (Local Loopback)

lo:1: flags=73<UP,LOOPBACK,RUNNING>  mtu 65536
        inet 192.168.23.112  netmask 0.0.0.0
        loop  txqueuelen 1000  (Local Loopback)

[root@Nginx-1 ~]# route
Kernel IP routing table
Destination     Gateway         Genmask         Flags Metric Ref    Use Iface
default         _gateway        0.0.0.0         UG    100    0        0 ens33
192.168.23.0    0.0.0.0         255.255.255.0   U     100    0        0 ens33
Nginx-1         0.0.0.0         255.255.255.255 UH    0      0        0 lo
Nginx-1         0.0.0.0         255.255.255.255 UH    0      0        0 lo